



In the Flow-Driven Sequence Setup lesson, you built a flow that managed sequences. The flow responded to events, but didn't do much with the data those events carried.
This time, we're building a flow that actually uses event data - setting fields, adding tags, and sending personalized emails based on what the event tells us about the subscriber and what they just did.
This is where flows go from "routing logic" to "personalized automation," and it's one of the things Jesse says SaaS companies get most excited about.
For reference, see the Events, Workflows, and Liquid Template Guide docs.
The Two Types of Data in Flow Emails
Before we build, there's one concept worth understanding clearly, because a lot of people don't realize this exists.
When a flow sends an email, that email has access to two types of data:
1. Visitor data ({{ visitor.* }}) - the subscriber's profile fields. First name, email, plan type, any custom field you've set on their record.
This is always available, regardless of how the flow was triggered.
2. Event data ({{ event.* }}) - data that came in with the triggering event. The event type, plus any key-value pairs in the event's details object.
Here's what that looks like in practice:
Hey {{ visitor.first_name | default: "there" }},

Thanks for signing up for the {{ event.details.plan_name }} plan!
visitor.first_name pulls from the subscriber's profile.
event.details.plan_name pulls from the data that was passed in with the event when it fired.
Both work inside the same email, and you can mix them freely.
This distinction matters because event data is contextual - it tells you what just happened right now, while visitor data tells you who the person is in general.
This means that if you need to access data in future emails that live outside this automation, it's important that any data needed for them is stored in the user's profile as fields, since event details are ephemeral and will disappear outside of this Flow chain.
What We're Building
Two chains on the same flow canvas:
The main chain is triggered by a $signed_up event and does three things:
- Sets a field on the subscriber's profile from the event data
- Adds a tag with a dynamic name based on the event data
- Sends a personalized welcome email using both visitor and event data
A test trigger chain is a tiny side chain that lets you test the main flow without needing external tools. You trigger a simple $test_signup_data_flow event on a test subscriber, the test chain fires the $signed_up event with dummy details, and the main chain kicks off automatically.
By the end, you'll have a working example of data flowing from an event, through a flow, and into a subscriber's profile and inbox - plus a reusable pattern for testing event-driven flows from within Bento.
Action Steps
1 - Set the previous lesson's flow to "draft" status
We'll use the same trigger event name here, so it's important to disable the previous flow to avoid double-triggers.
2 - Create a new flow with an event trigger
Go to Flows and create a new flow.
Name it something like "Bento Training - Signup Data Flow."
For the trigger, choose Event Received and set it to listen for the event $signed_up.
Leave the flow in Draft mode for now.
We'll activate it once everything is wired up and tested.
3 - Create and add a personalized email
Now add a Send Email action after the tag step.
You'll need to create an email template for it. Can just stick to Shoji for now.
When creating the email, use both visitor and event data in the content:
Subject line idea:
Welcome to the {{ event.details.plan_name }} Plan, {{ visitor.first_name | default: "friend" }}!
Body example:
Hey {{ visitor.first_name | default: "there" }},

Thanks for signing up for the {{ event.details.plan_name }} plan!

We're excited to have you on board. Here's what to do next...
Keep it simple for now.
The point is seeing how both data sources work together in a real email.
The | default: "there" filter is important; it provides a fallback if the subscriber doesn't have a first name set.
Always use defaults for fields that might be empty. (Or use a liquid conditional expression to hide lines when required fields are missing) But don't worry about that yet.
We'll go deeper on Liquid in the How To Use Liquid In Bento For Epic Power lesson. For now, the basics above are all you need.
4 - Add a "Set Field" action
Add a Set Field action as the first step after the trigger.
Set the field name to plan_type.
For the value, use the Liquid expression:
{{ event.details.plan_name }}
This pulls the plan_name value from the event's details and writes it to the subscriber's plan_type field.
So if someone signs up and the event fires with "plan_name": "Professional", their profile will now show plan_type = "Professional".
This is one of the most useful patterns in Bento: using event data to populate subscriber fields automatically, so you don't have to set them separately.
5 - Add an "Add Tag" action
Add an Add Tag action after the Set Field step.
For the tag name, you can use Liquid to make it dynamic:
Signup - {{ event.details.plan_name }} Plan
This would create tags like Signup - Professional Plan, Signup - Free Plan, etc., based on whatever plan name the event carried.
If you'd rather keep it simple, a static tag like Flag - Signed Up works fine too.
Dynamic tags are a power move, not a requirement.
In my setup, I often like to add two tags: One generic "customer" tag that all customers get, regardless of what they bought, to make it easy for me to see all customers, and then a separate one for the specific thing they bought.
So in this case, if I were doing it "for realzies," I'd probably scaffold out the following tags:
Flag - CustomerFlag - Customer - Pro PlanFlag - Customer - Lite PlanFlag - Lead - Free Plan
A note on routing: in a real setup, you might want different outcomes based on the plan name - a "Premium" tag for premium signups, a "Free" tag for free ones.
Bento gives you a few ways to handle that: field-value splits (branch based on whether a field equals a specific value), simple if/else conditions, or magic splits using Liquid expressions.
In the video I briefly show a field-value split on screen so you can see the shape, but we'll dig into magic splits properly in the How To Use Liquid In Bento For Epic Power lesson.
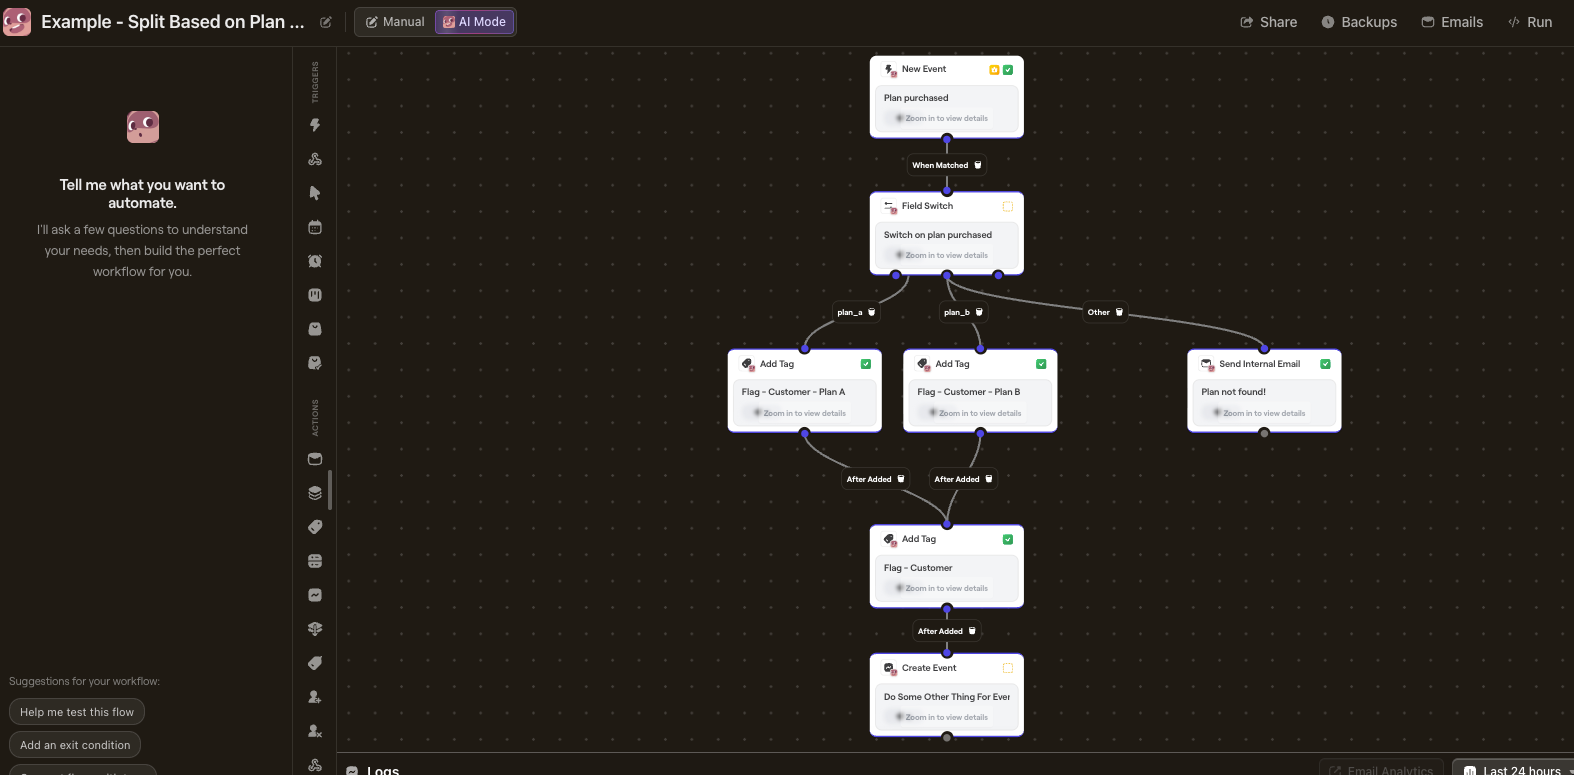
For now, the simple "one tag, one action" pattern we're building here is the right starting point.
6 - Build a test trigger chain
Here's a practical pattern you can reuse for any event-driven flow: instead of needing external tools to fire test events with specific data, build a tiny test chain right on the same flow canvas.
Add a second trigger to your canvas: Event Received, listening for $test_signup_data_flow or whatever you want.
Connect it to a single action: Create Event, which fires $signed_up with the following details:
{
  "plan_name": "Professional"
}
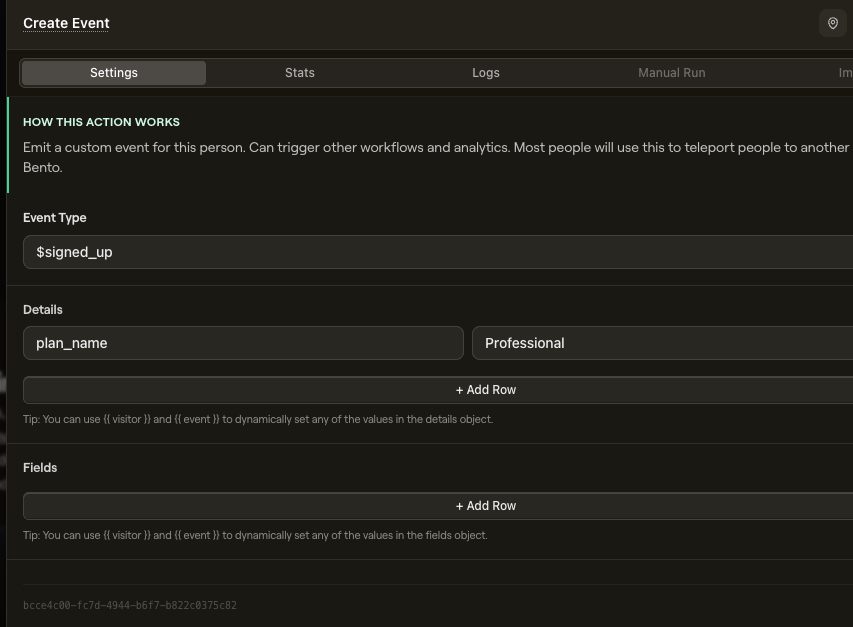
That's the whole test chain. When $test_signup_data_flow fires on a subscriber, the chain fires the $signed_up event with those dummy details, which kicks off the main chain.
This is a variation of the "passing event data downstream" pattern we covered in the Events & Flows Overview lesson - except here, you're specifying static test data instead of forwarding data from a previous event.
7 - Test the flow
First, use Bento's built-in flow test suite to verify the logic routes correctly.
You'll need the flow published first. Then in the flow editor, click Start a task > Test.
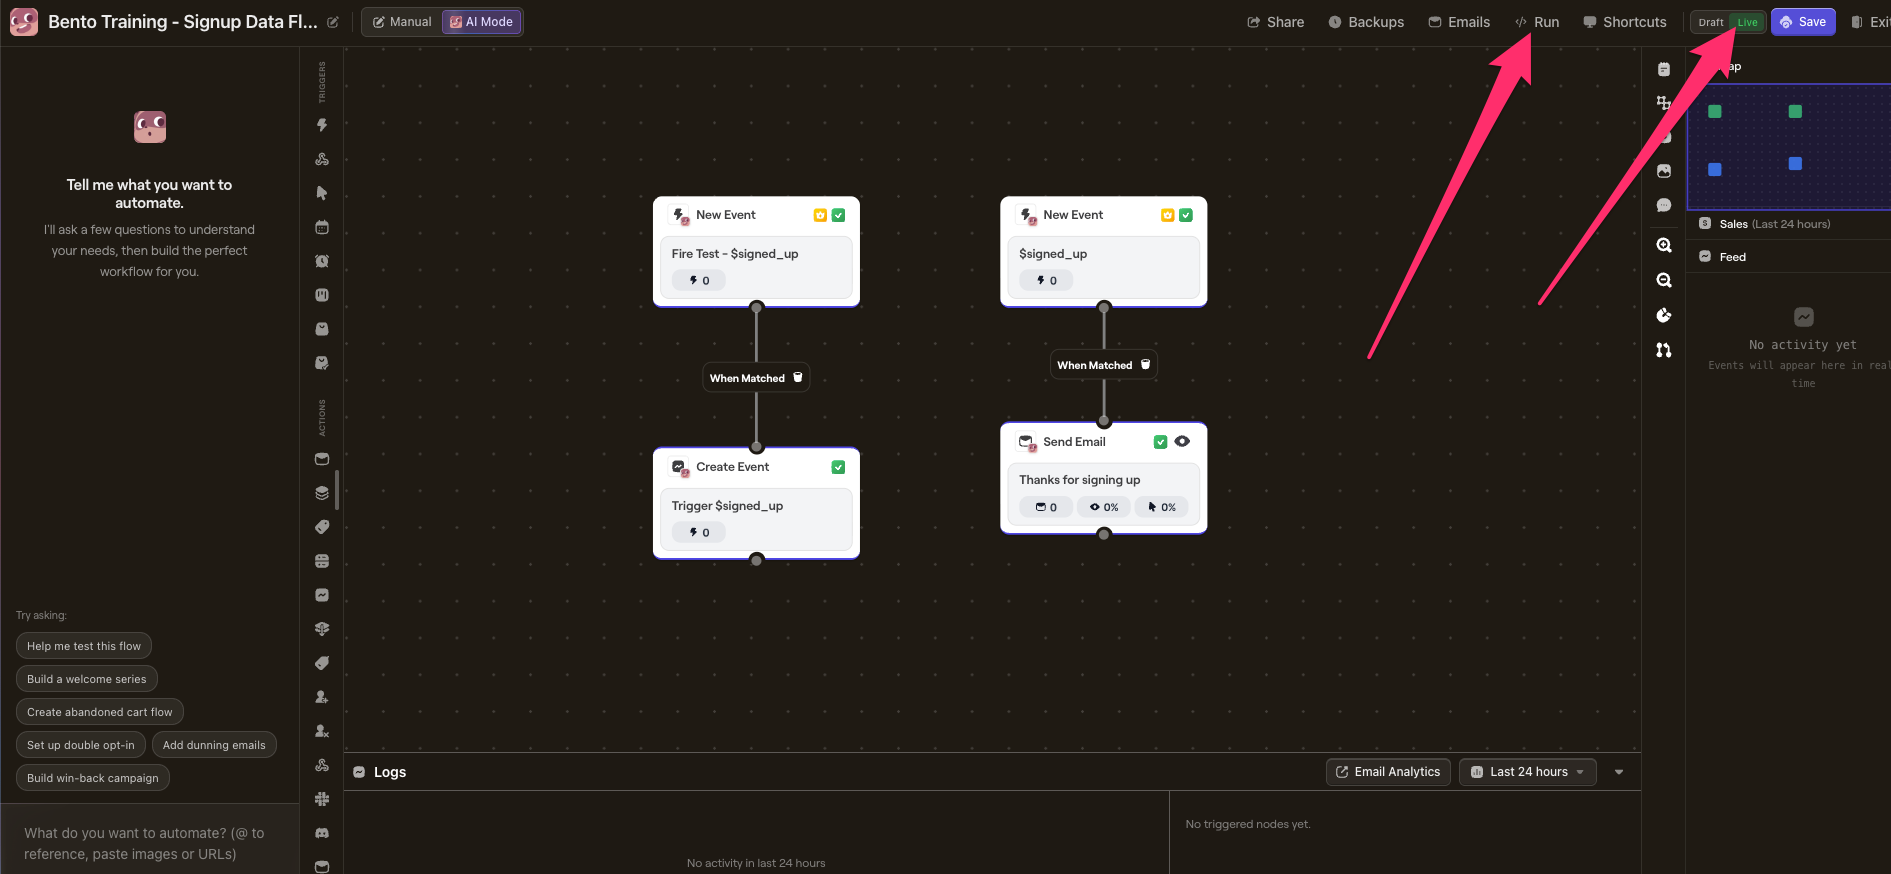
Then choose "Manually add user."
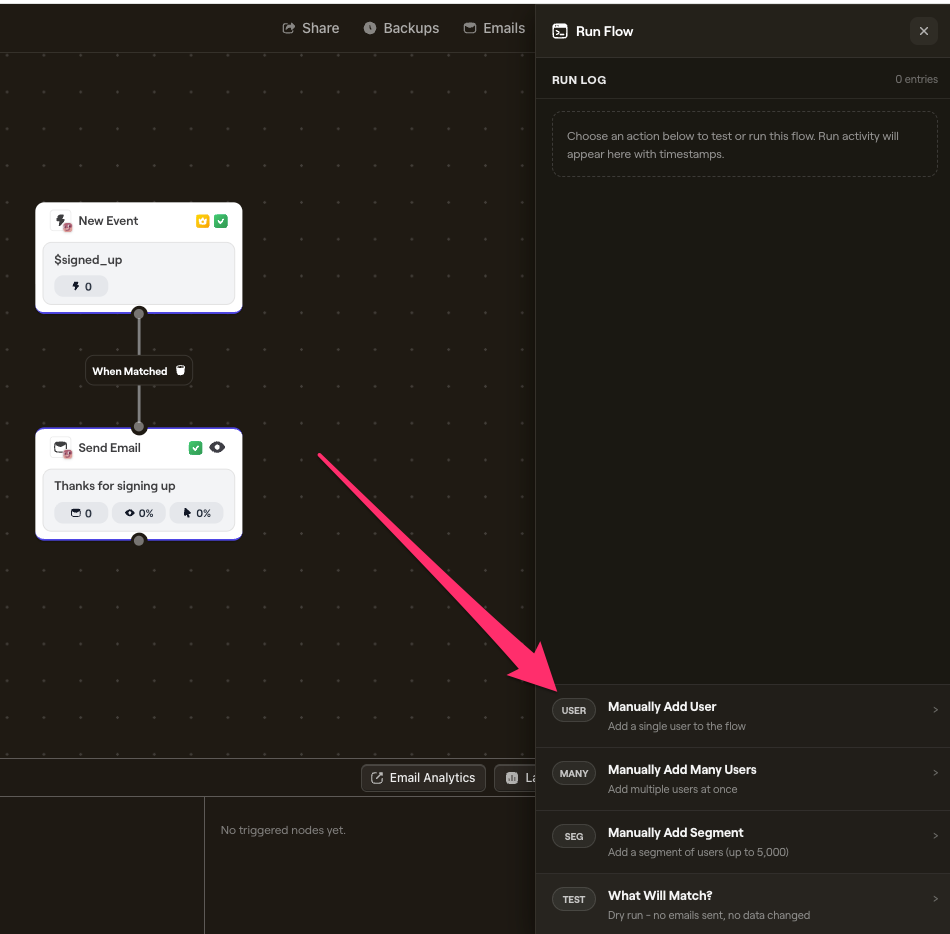
Choose your test-firing event, add a test email that you can check, and run it.
If the test email maps to one of your already-created subscribers with a first_name set, it'll display their already-set first name; otherwise it'll use the "friend" fallback.
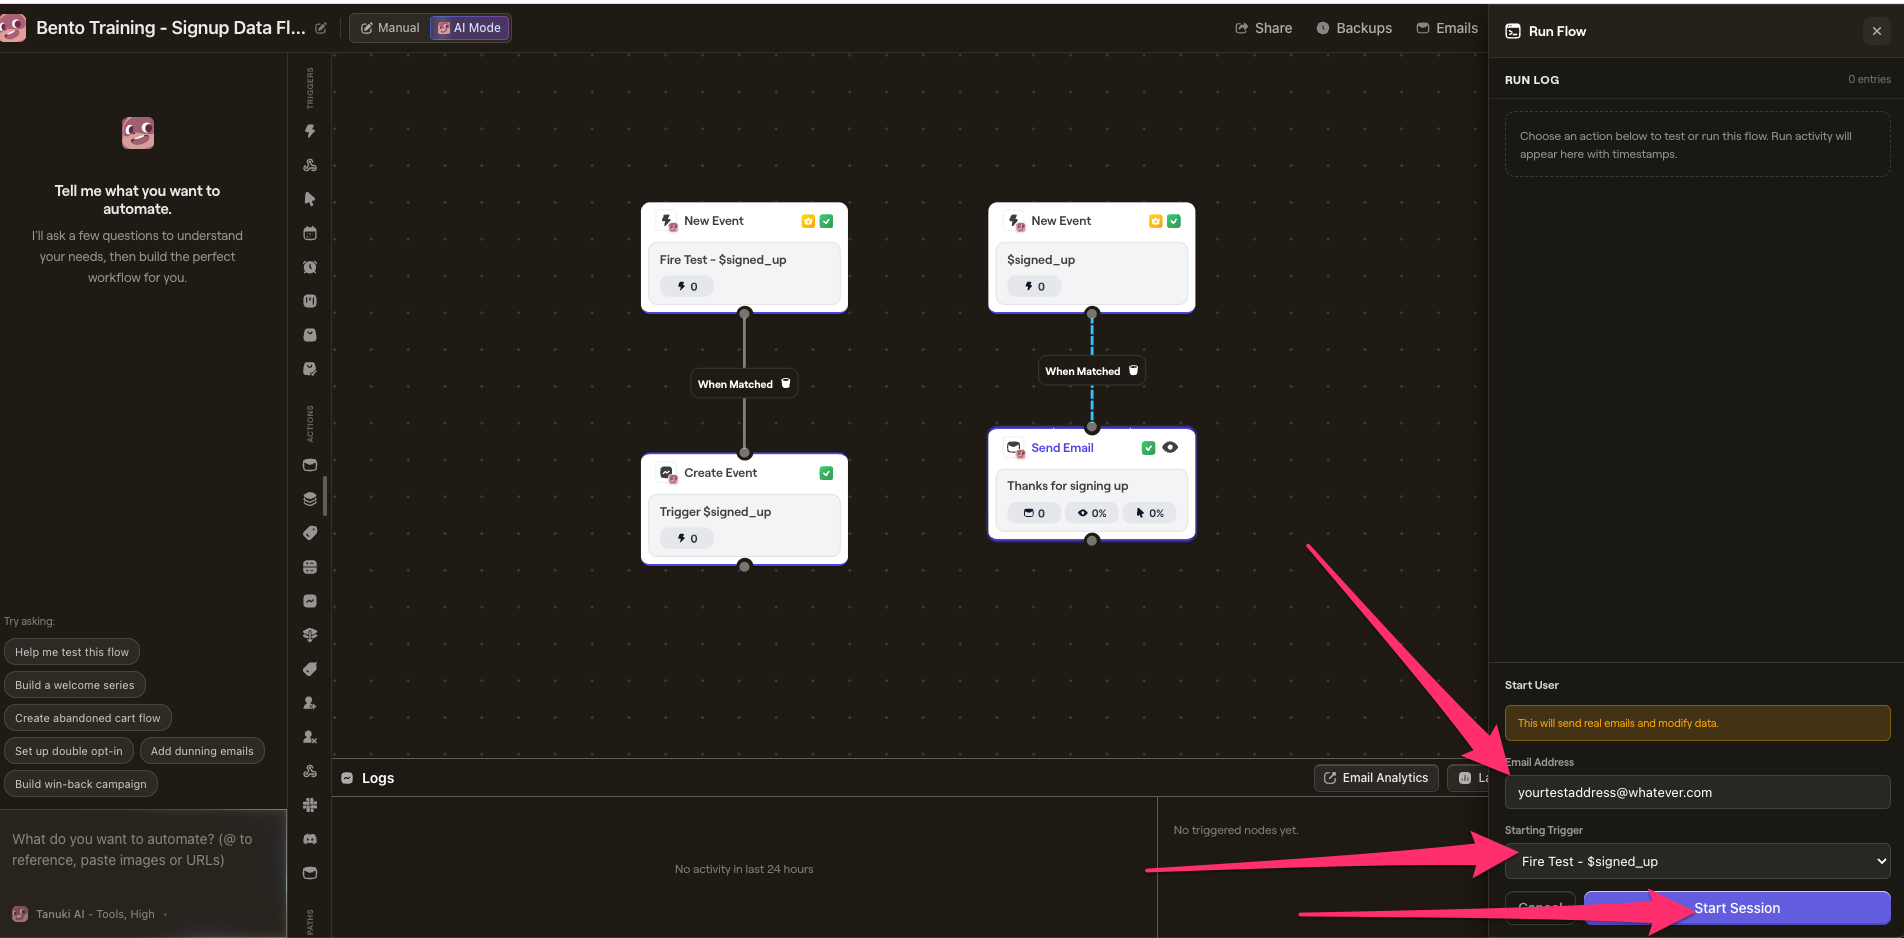
You'll see the event move through each step of your flow, which is great for catching logic mistakes before real subscribers hit it.
The test chain fires $signed_up with the dummy details, the main chain picks it up, and you should see:
plan_typeset to "Professional" on the subscriber's profile- The tag applied (either dynamic or static, depending on what you chose)
- The welcome email sent with personalized content
And you should also see the email in your inbox with the event details correctly passing in to the template:
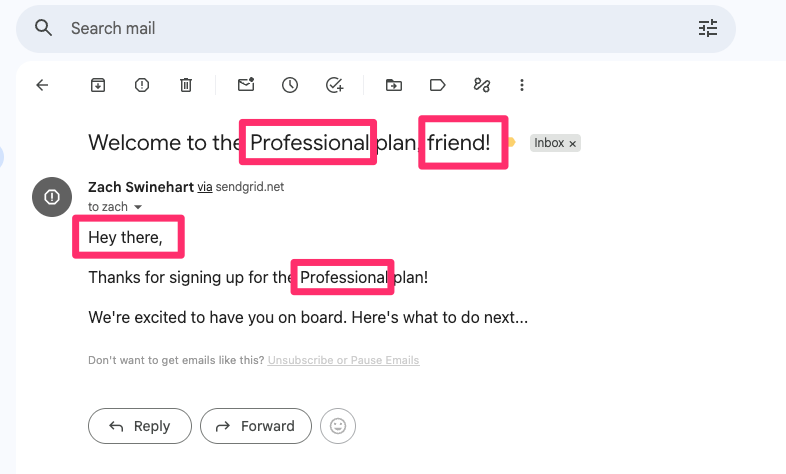
Check the subscriber's profile afterward to confirm everything landed.
For the full rundown on the test suite, see the How to Test Email Flows guide.
We'll practice branching with magic splits, field switches, and dynamic event dispatching in the Build & Test Advanced Flow Branching lesson.
When to move on
- You've built a flow with a main chain triggered by a custom event
- The flow sets a field from event data (
{{ event.details.* }}) - The flow adds a tag (static or dynamic)
- The flow sends an email that uses both
{{ visitor.* }}and{{ event.details.* }} - You've built a test trigger chain that fires the main event with dummy details
- You've tested the flow end-to-end using the test trigger
- You understand the difference between visitor data and event data in flow emails