How to track and convert high intent visitors with Workflows
If you're noticing you have subscribers who are consistently engaging with your content, whether it's emails, articles, podcasts etc, and then they're also clicking through to product/sales pages but not purchasing — we want to keep track of those events because they're signaling that they have an intent to purchase but something is blocking them from completing that final step. This is where we can start sending those subscribers personalized campaigns using Workflows to convert those high intent subscribers into paying customers.
How it works
With Bento's event-based Workflows, we can set up a trigger for whenever a subscriber clicks through to a product page.
We'll then check if that subscriber has purchased the product before, and if they haven't, we'll assign them a "product_click_count" custom field and increment it's value by 1 for each time they click through to a product page.
If a subscriber's "product_click_count" reaches a total of 3 or more, we'll add them to a personalized Email Sequence and reset their "product_click_count" back to zero.
Initial Setup
Before we get started with creating the workflow, there's a couple of things we need to set up.
First of all, you will want to add the custom field product_click_count to at least one of your subscribers to enable you to later select that custom field as a rule in your Workflow.
Lastly, you will want to create an Email Sequence that's personalized to the product that the subscriber is clicking through to. As an example, that could be either answering frequently asked questions about the product, social proof or maybe even an introductory discount. Have that set up and ready to select in your Workflow before you go any further.
Creating the Workflow
First of all, create your Workflow by navigating to Workflows and click Create Workflow.
Now you're in your new Workflow, start by giving it a name in the top left and switch the toggle on to make the Workflow repeatable.
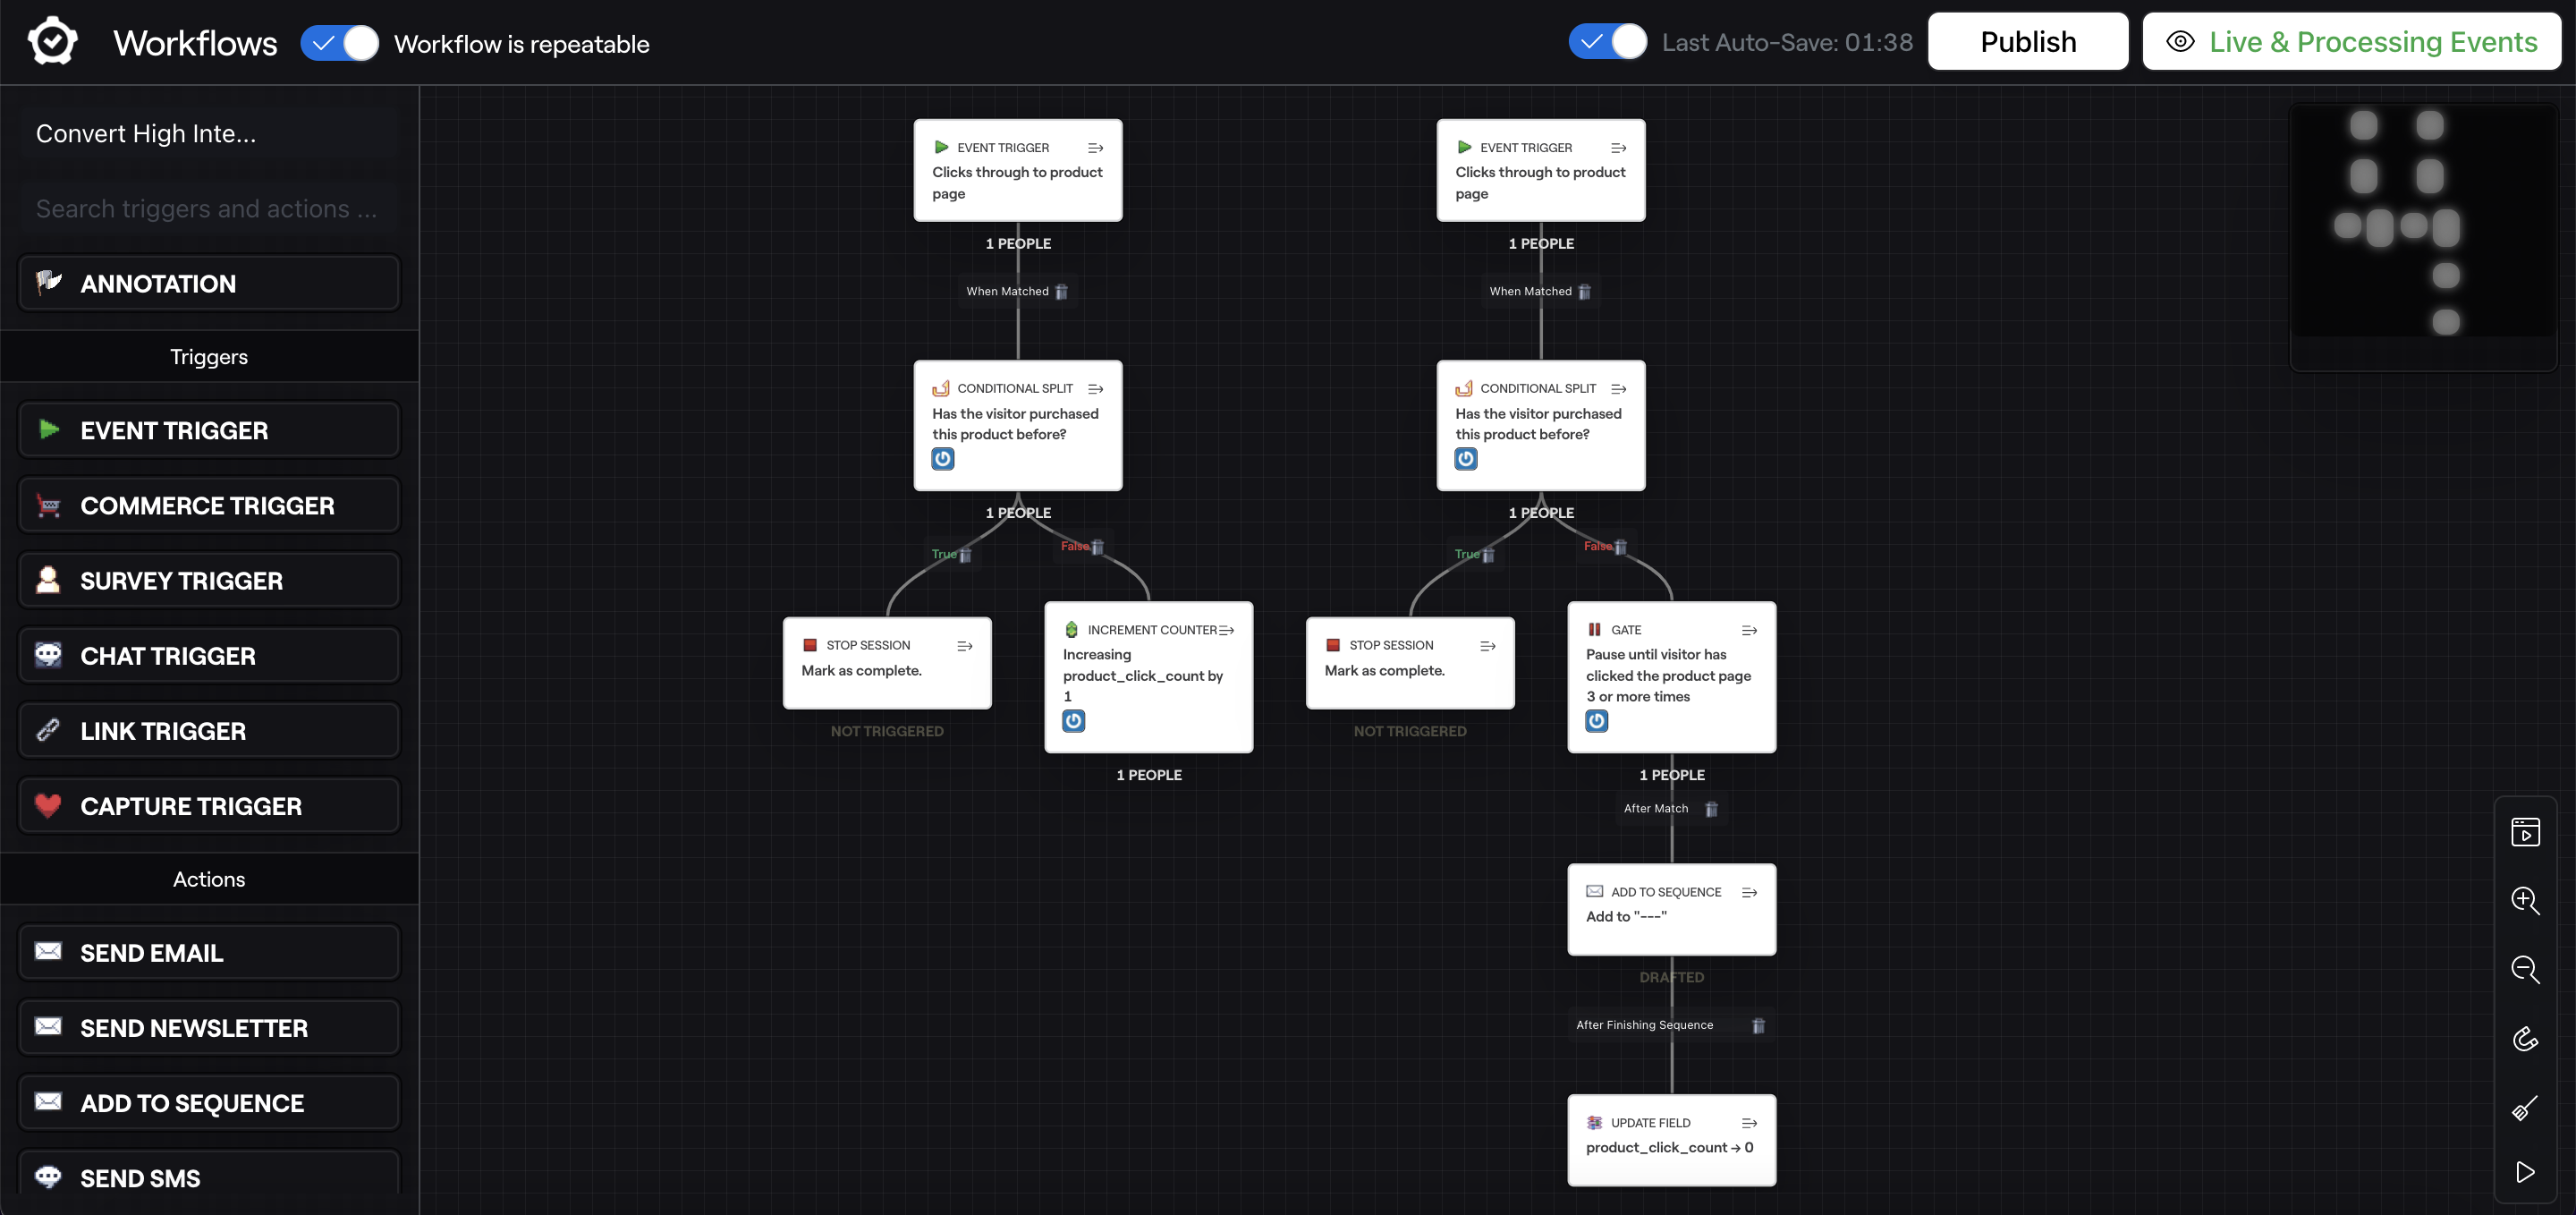
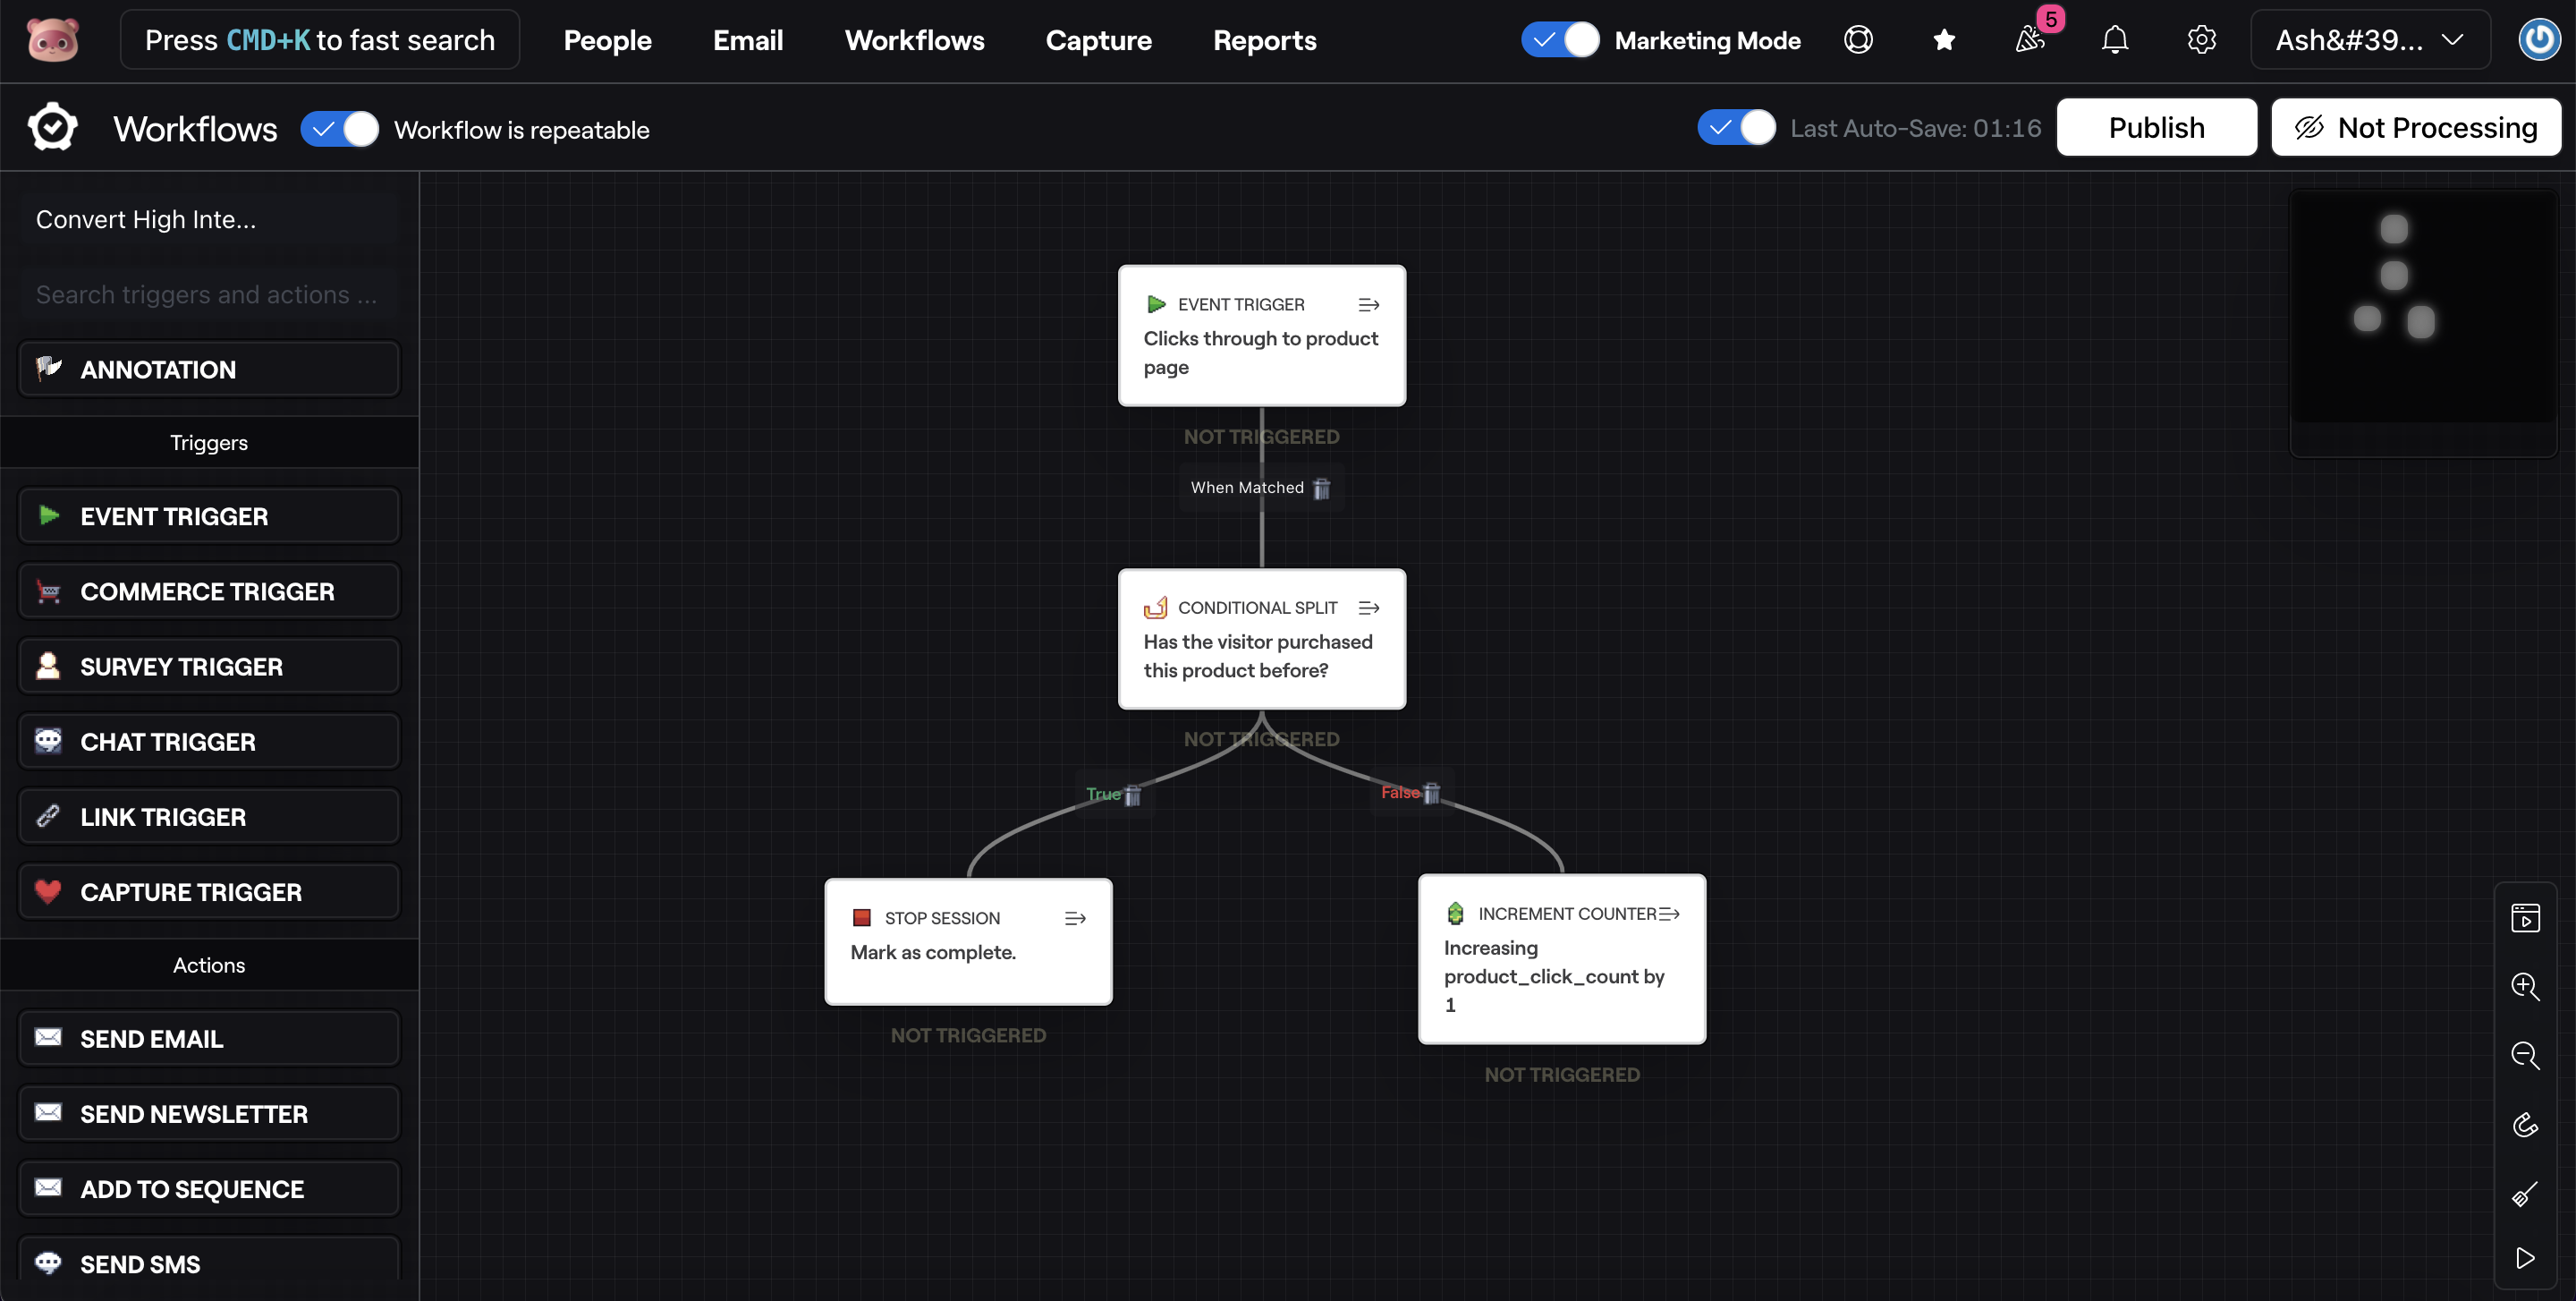
1st Flow
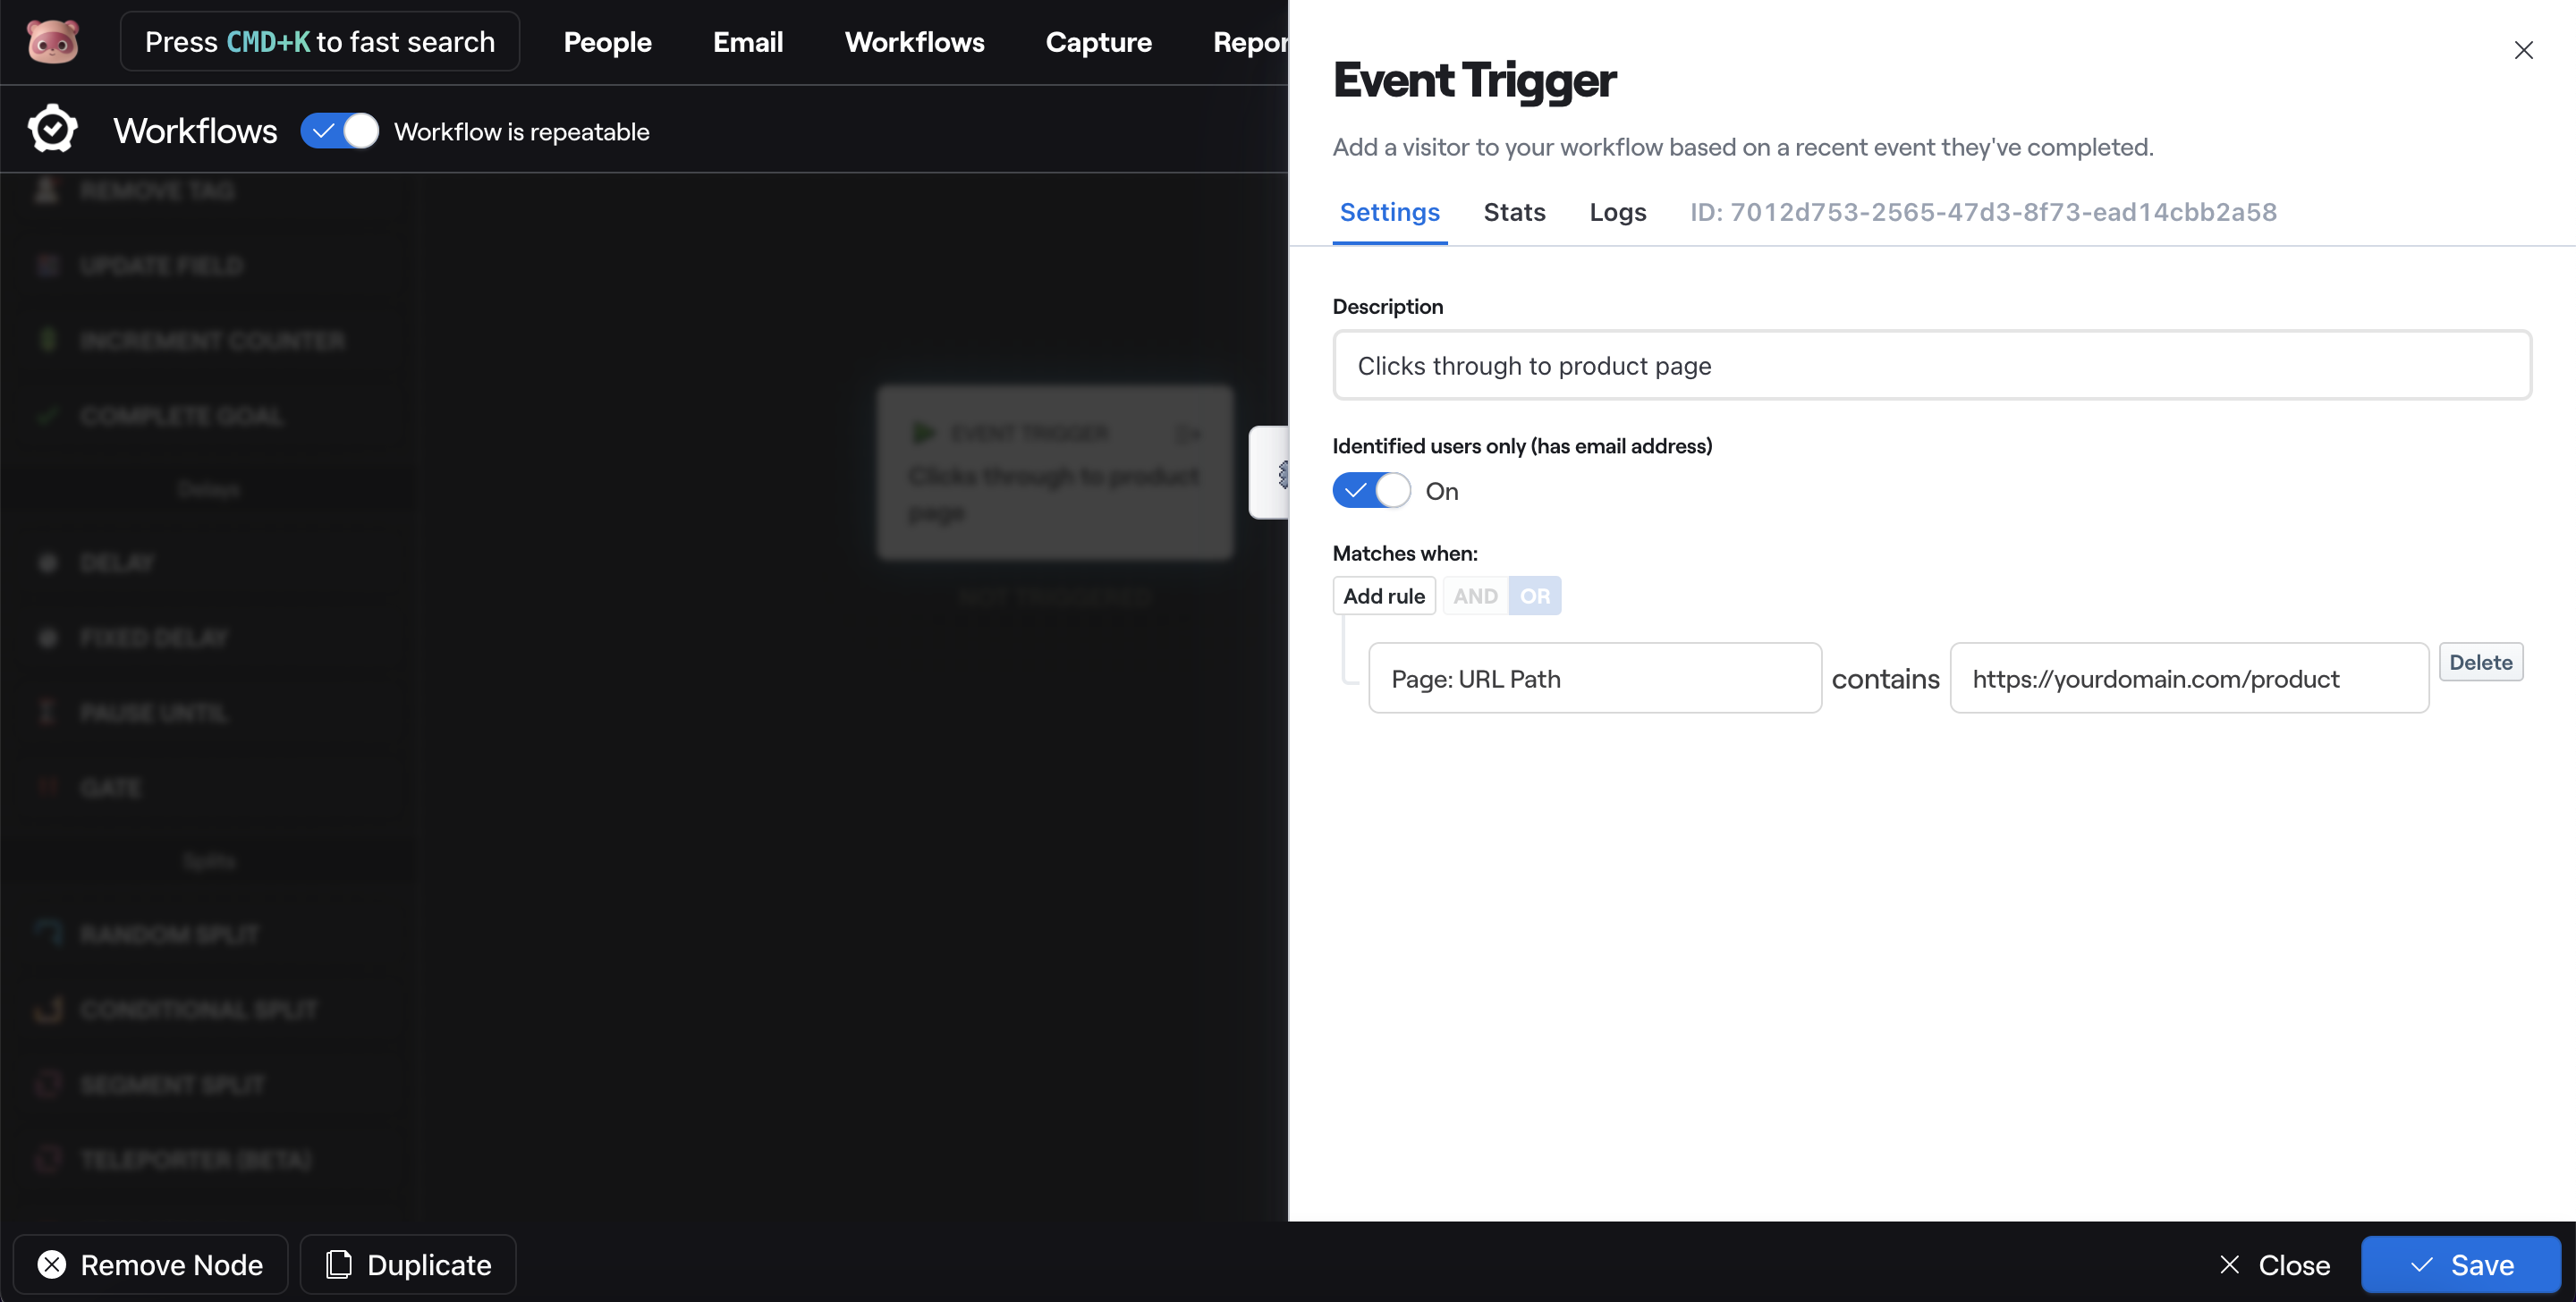
Next, we'll start with the first flow, so go ahead and edit the Event Trigger that's added by default by clicking the icon in the top right which will open the settings menu. Give the Event Trigger a description and toggle "Identified users only (has email address)" to on.
For the rules, we want to add Page: URL Path and add our product page URL as the value. If you want your Workflow to trigger on multiple product pages, add a rule for each product page and make sure you've set the operator to OR.
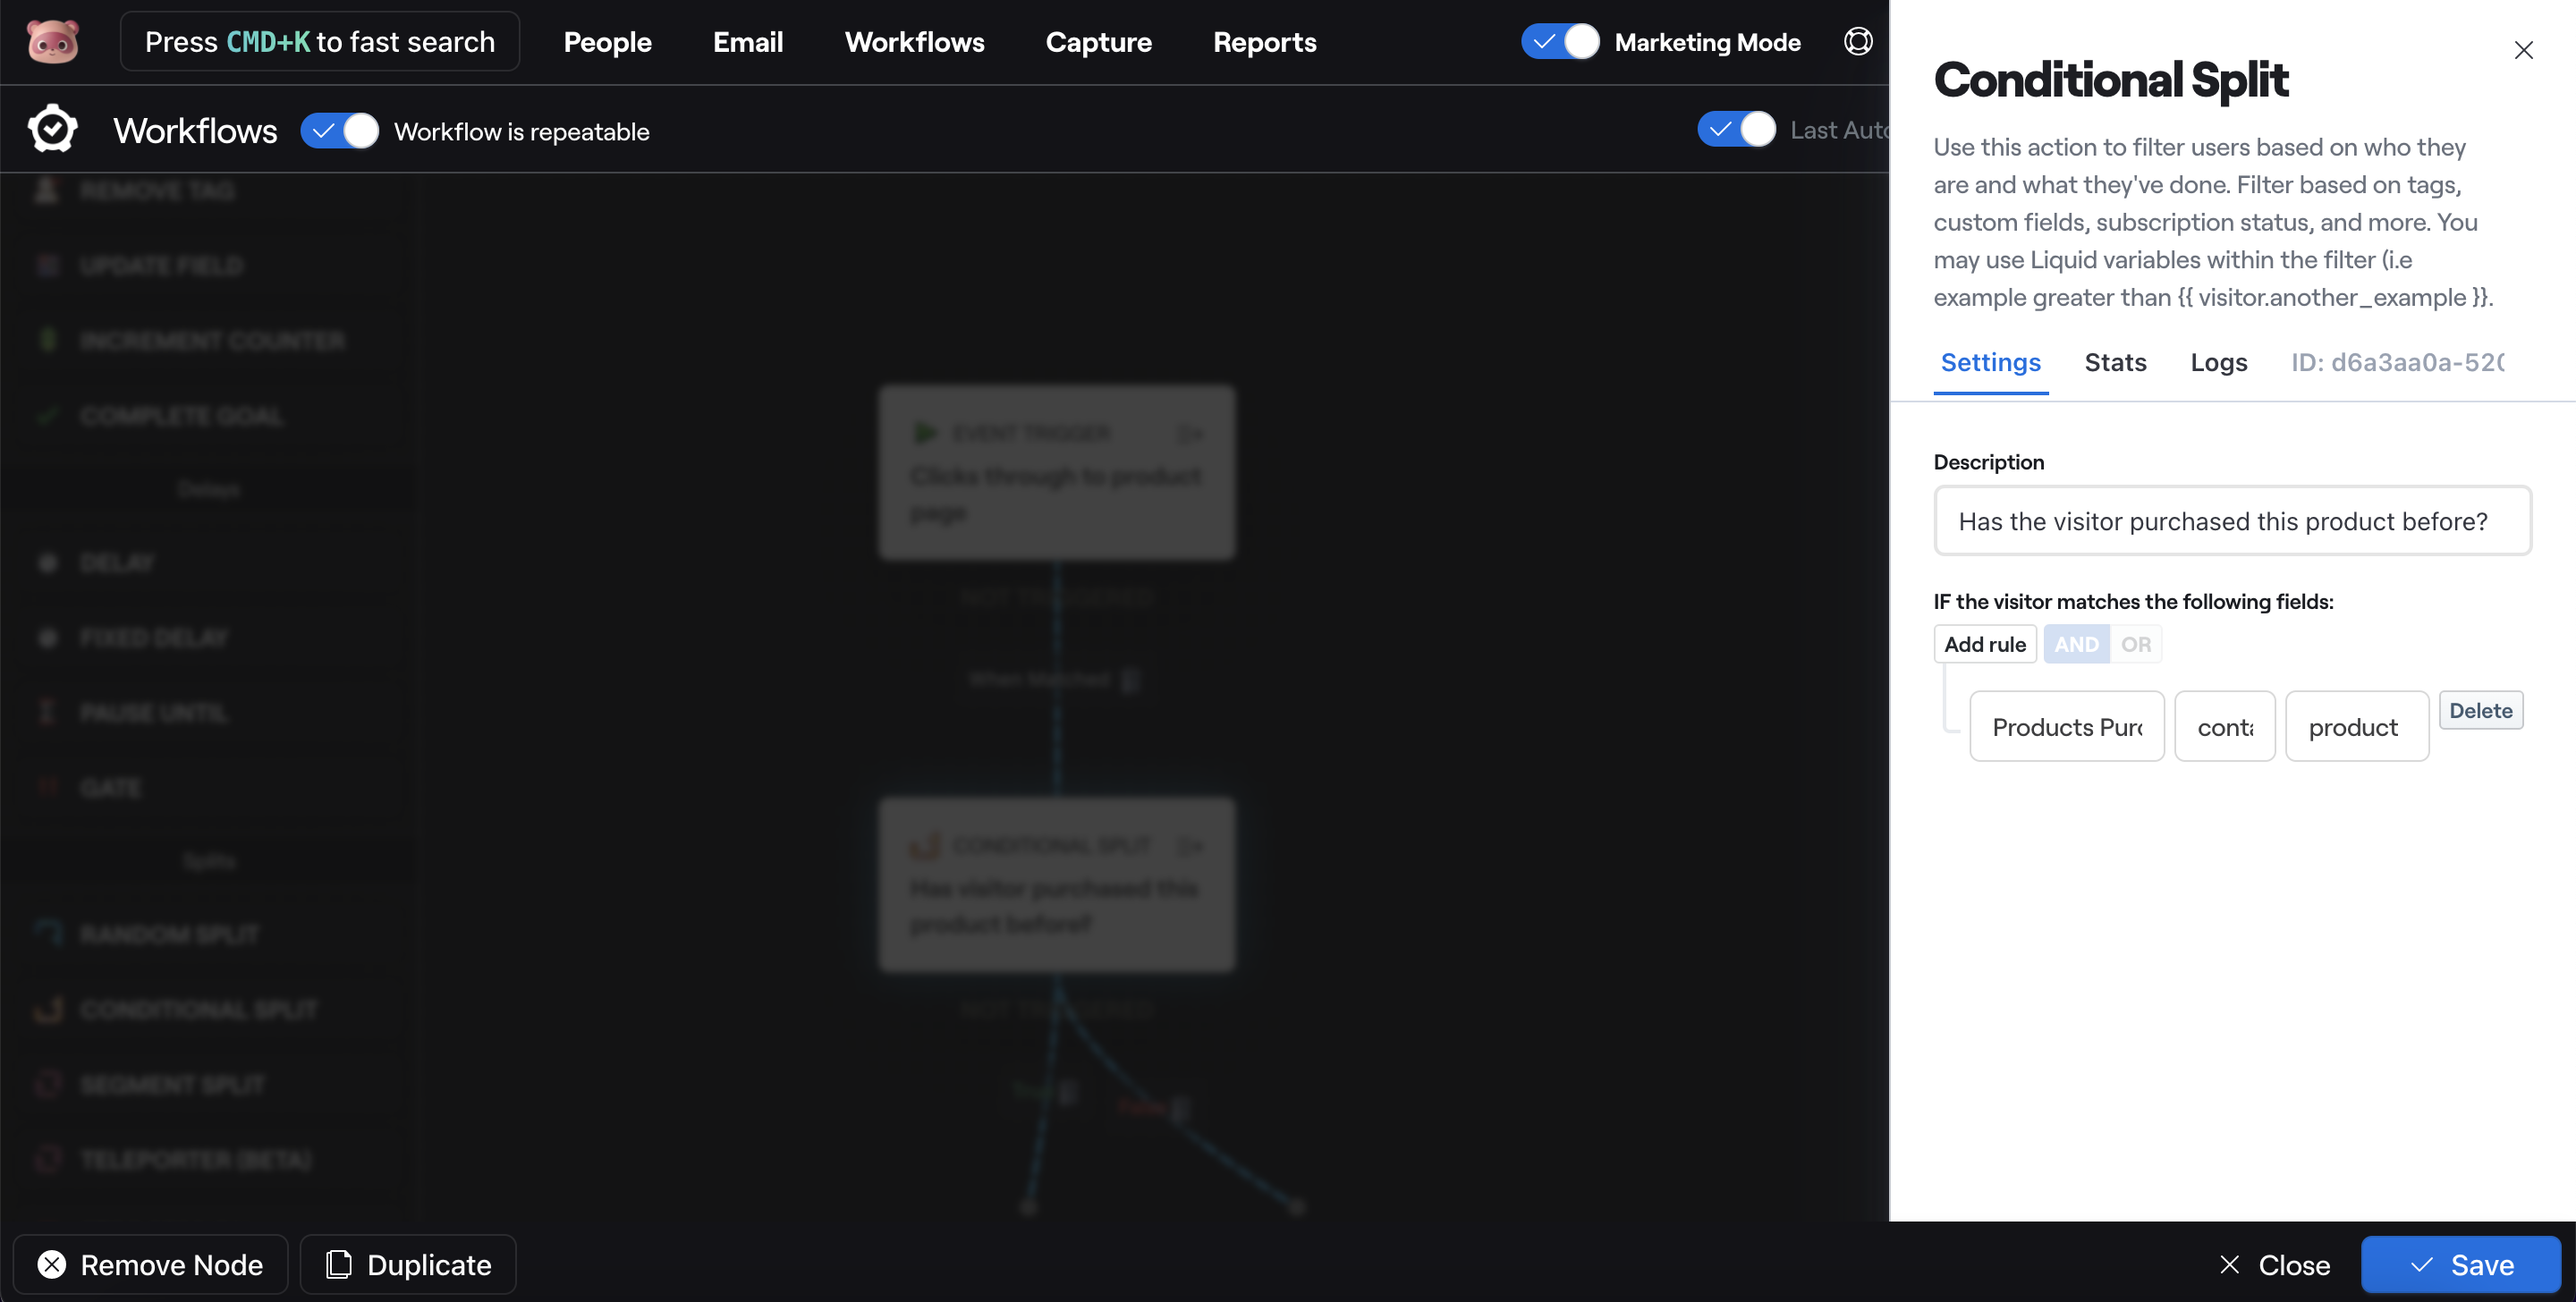
Add a Conditional Split and connect your Event Trigger node to the Conditional Split. We'll be using this to check if the subscriber has purchased the product before. If they have, we'll end the Workflow. If they haven't, we'll continue to the next step in the Workflow.
To do that, edit the Conditional Split, give it a description and add either a Products Purchased (by Name) or Products Purchased (by SKU) rule depending on what works best for you.
If the Conditional Split evaluates to True, we want to stop the Workflow as the subscribers has already purchased the product. Therefore, we'll add the Stop Session node to the True branch.
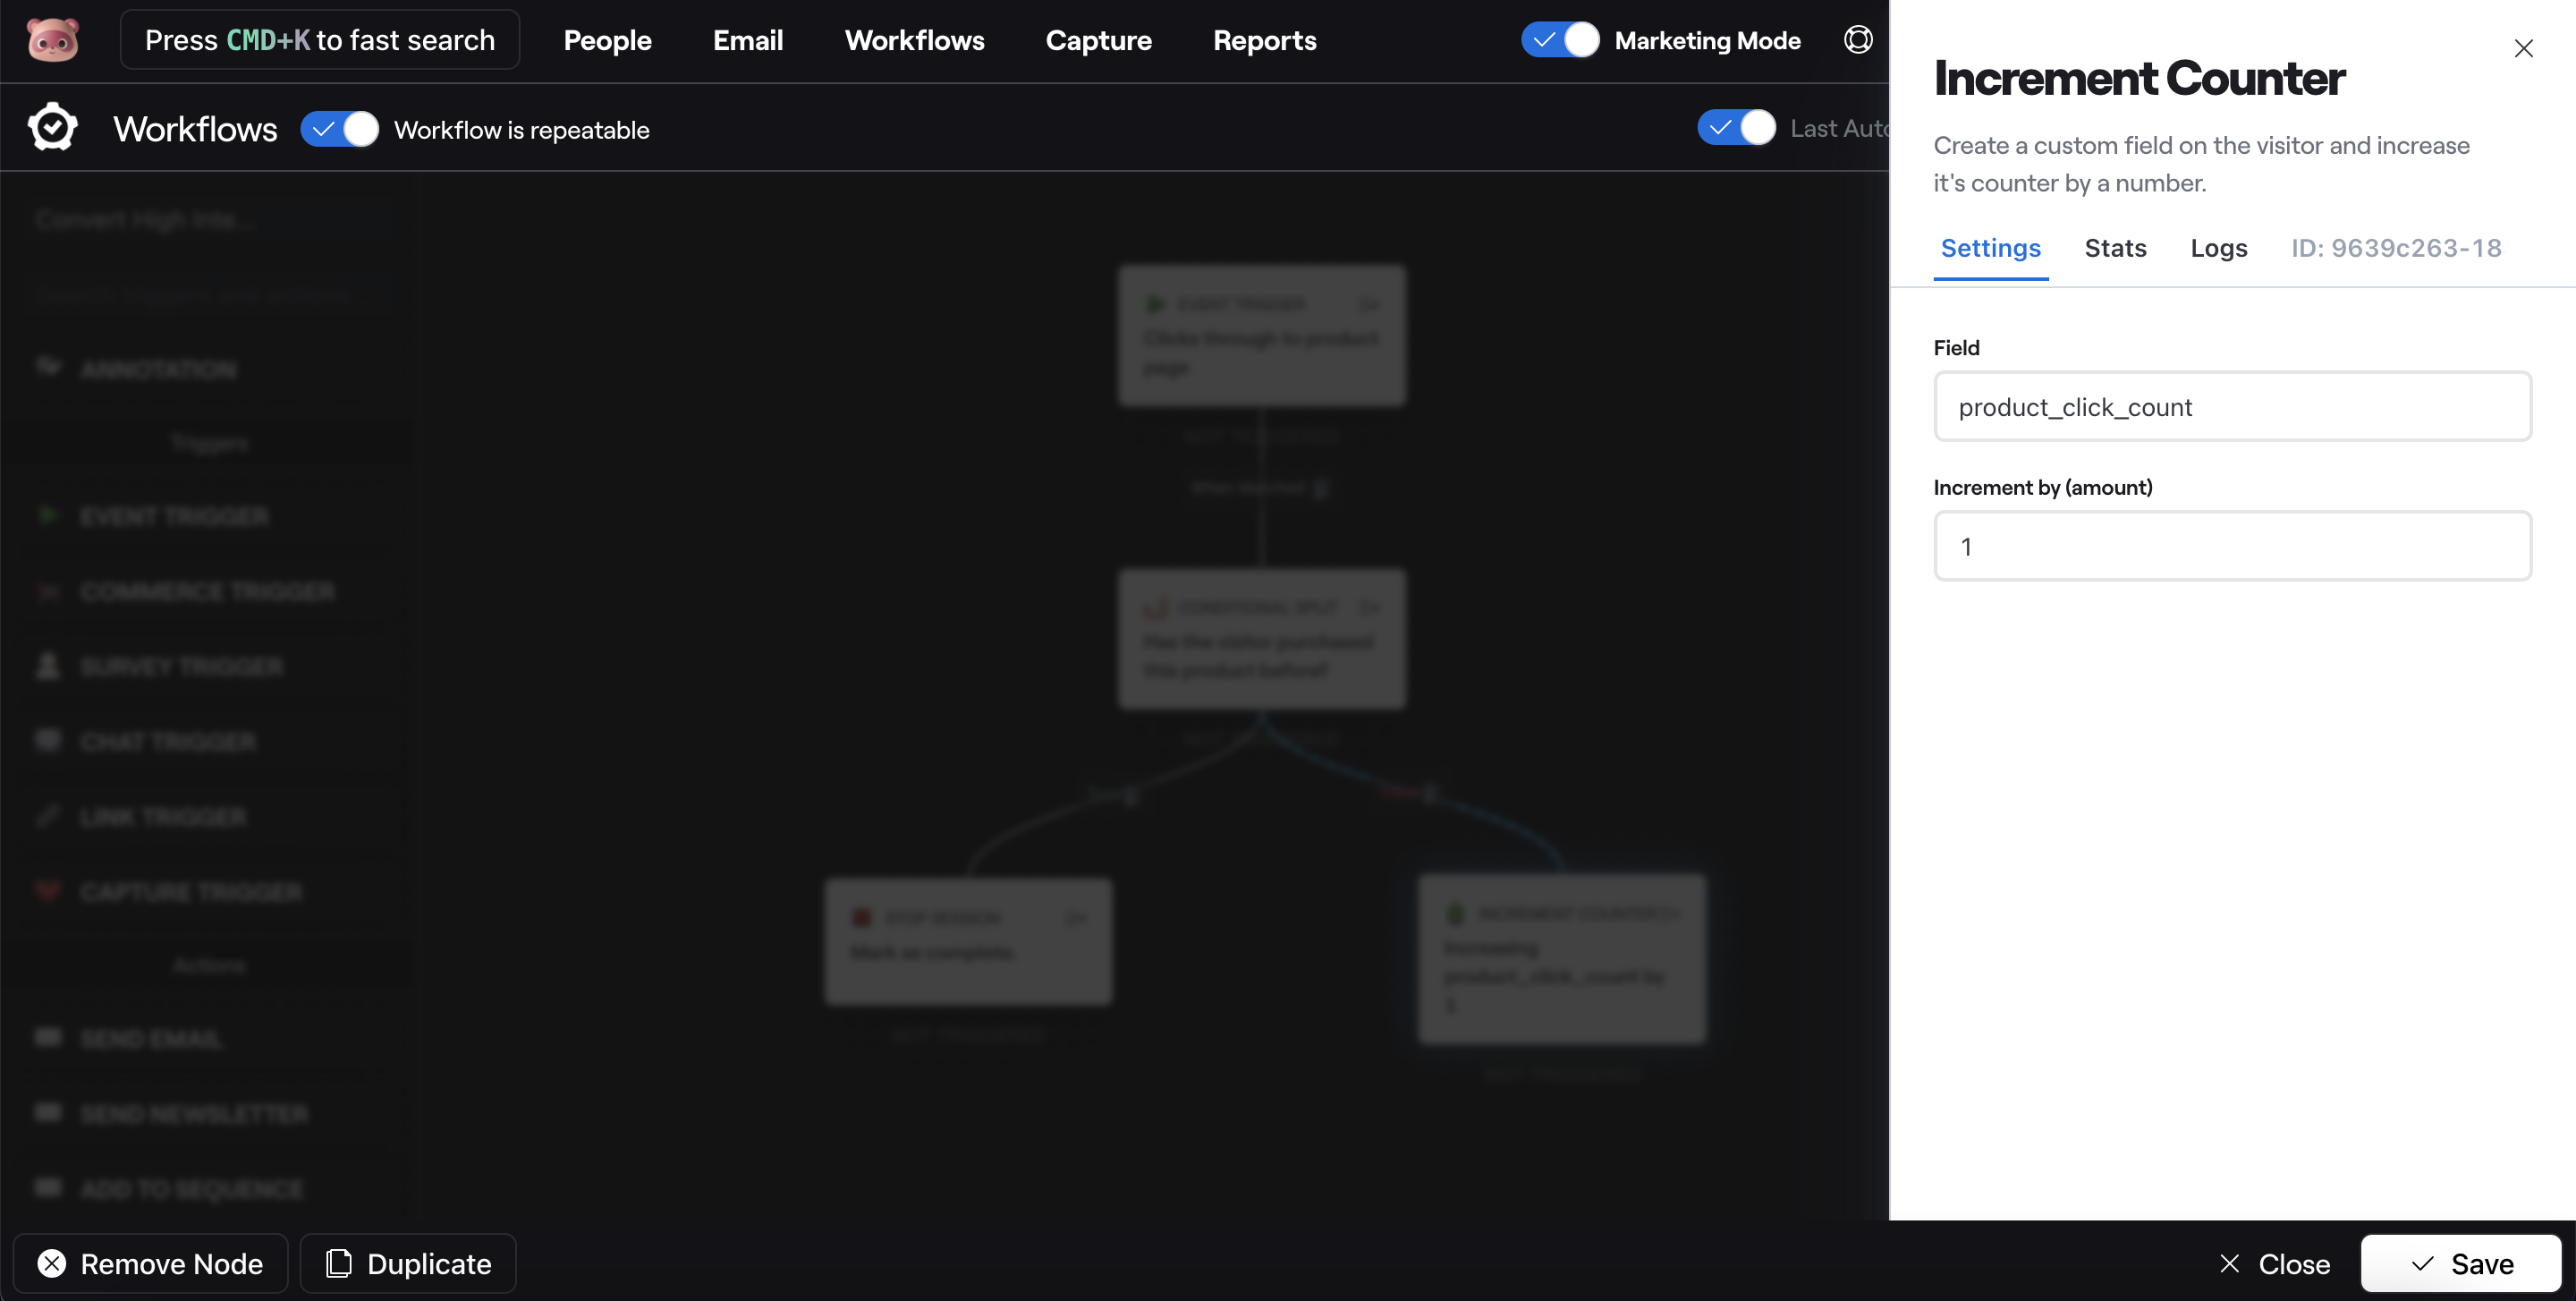
However, if the Conditional Split evaluates to False, we want to increment our custom field product_click_count — which keeps track of the subscriber's product page clicks — by 1.
Here's the complete first flow:
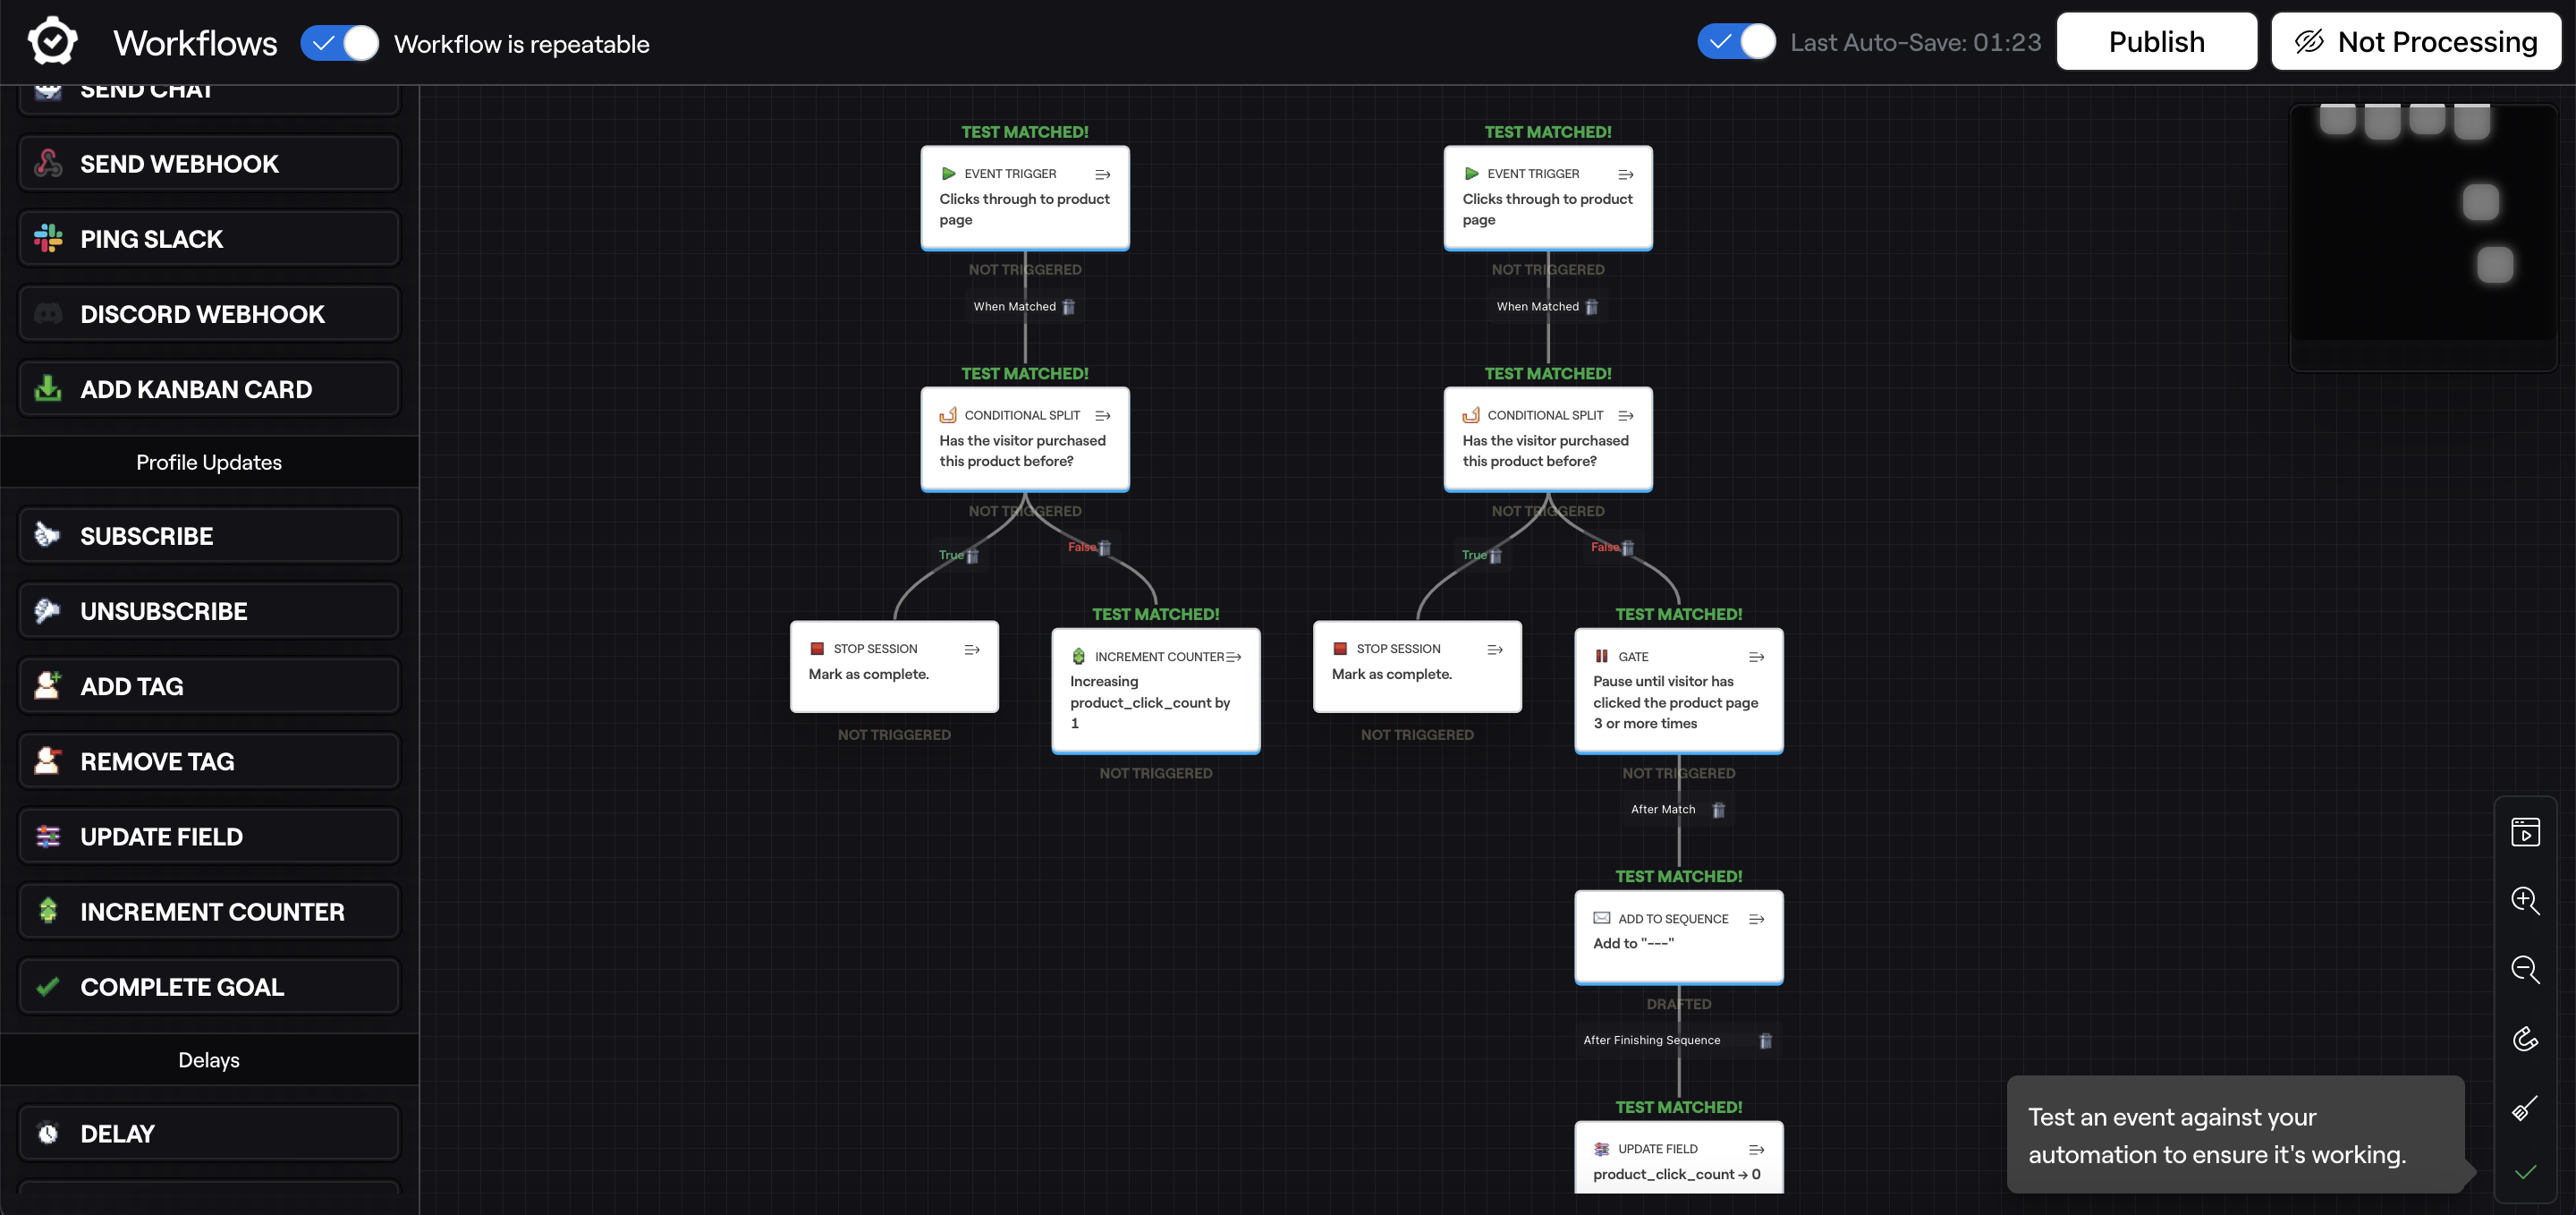
2nd Flow
Drag an Event Trigger on to the Workflow canvas so it's paralell to to the Event Trigger in your 1st flow, then edit your new Event Trigger and duplicate the description and rules of your other Event Trigger.
Next add a Conditional Split which again should have the same description and rules as the Conditional Split you setup in the 1st flow. And for the True branch, add a Stop Session Node.
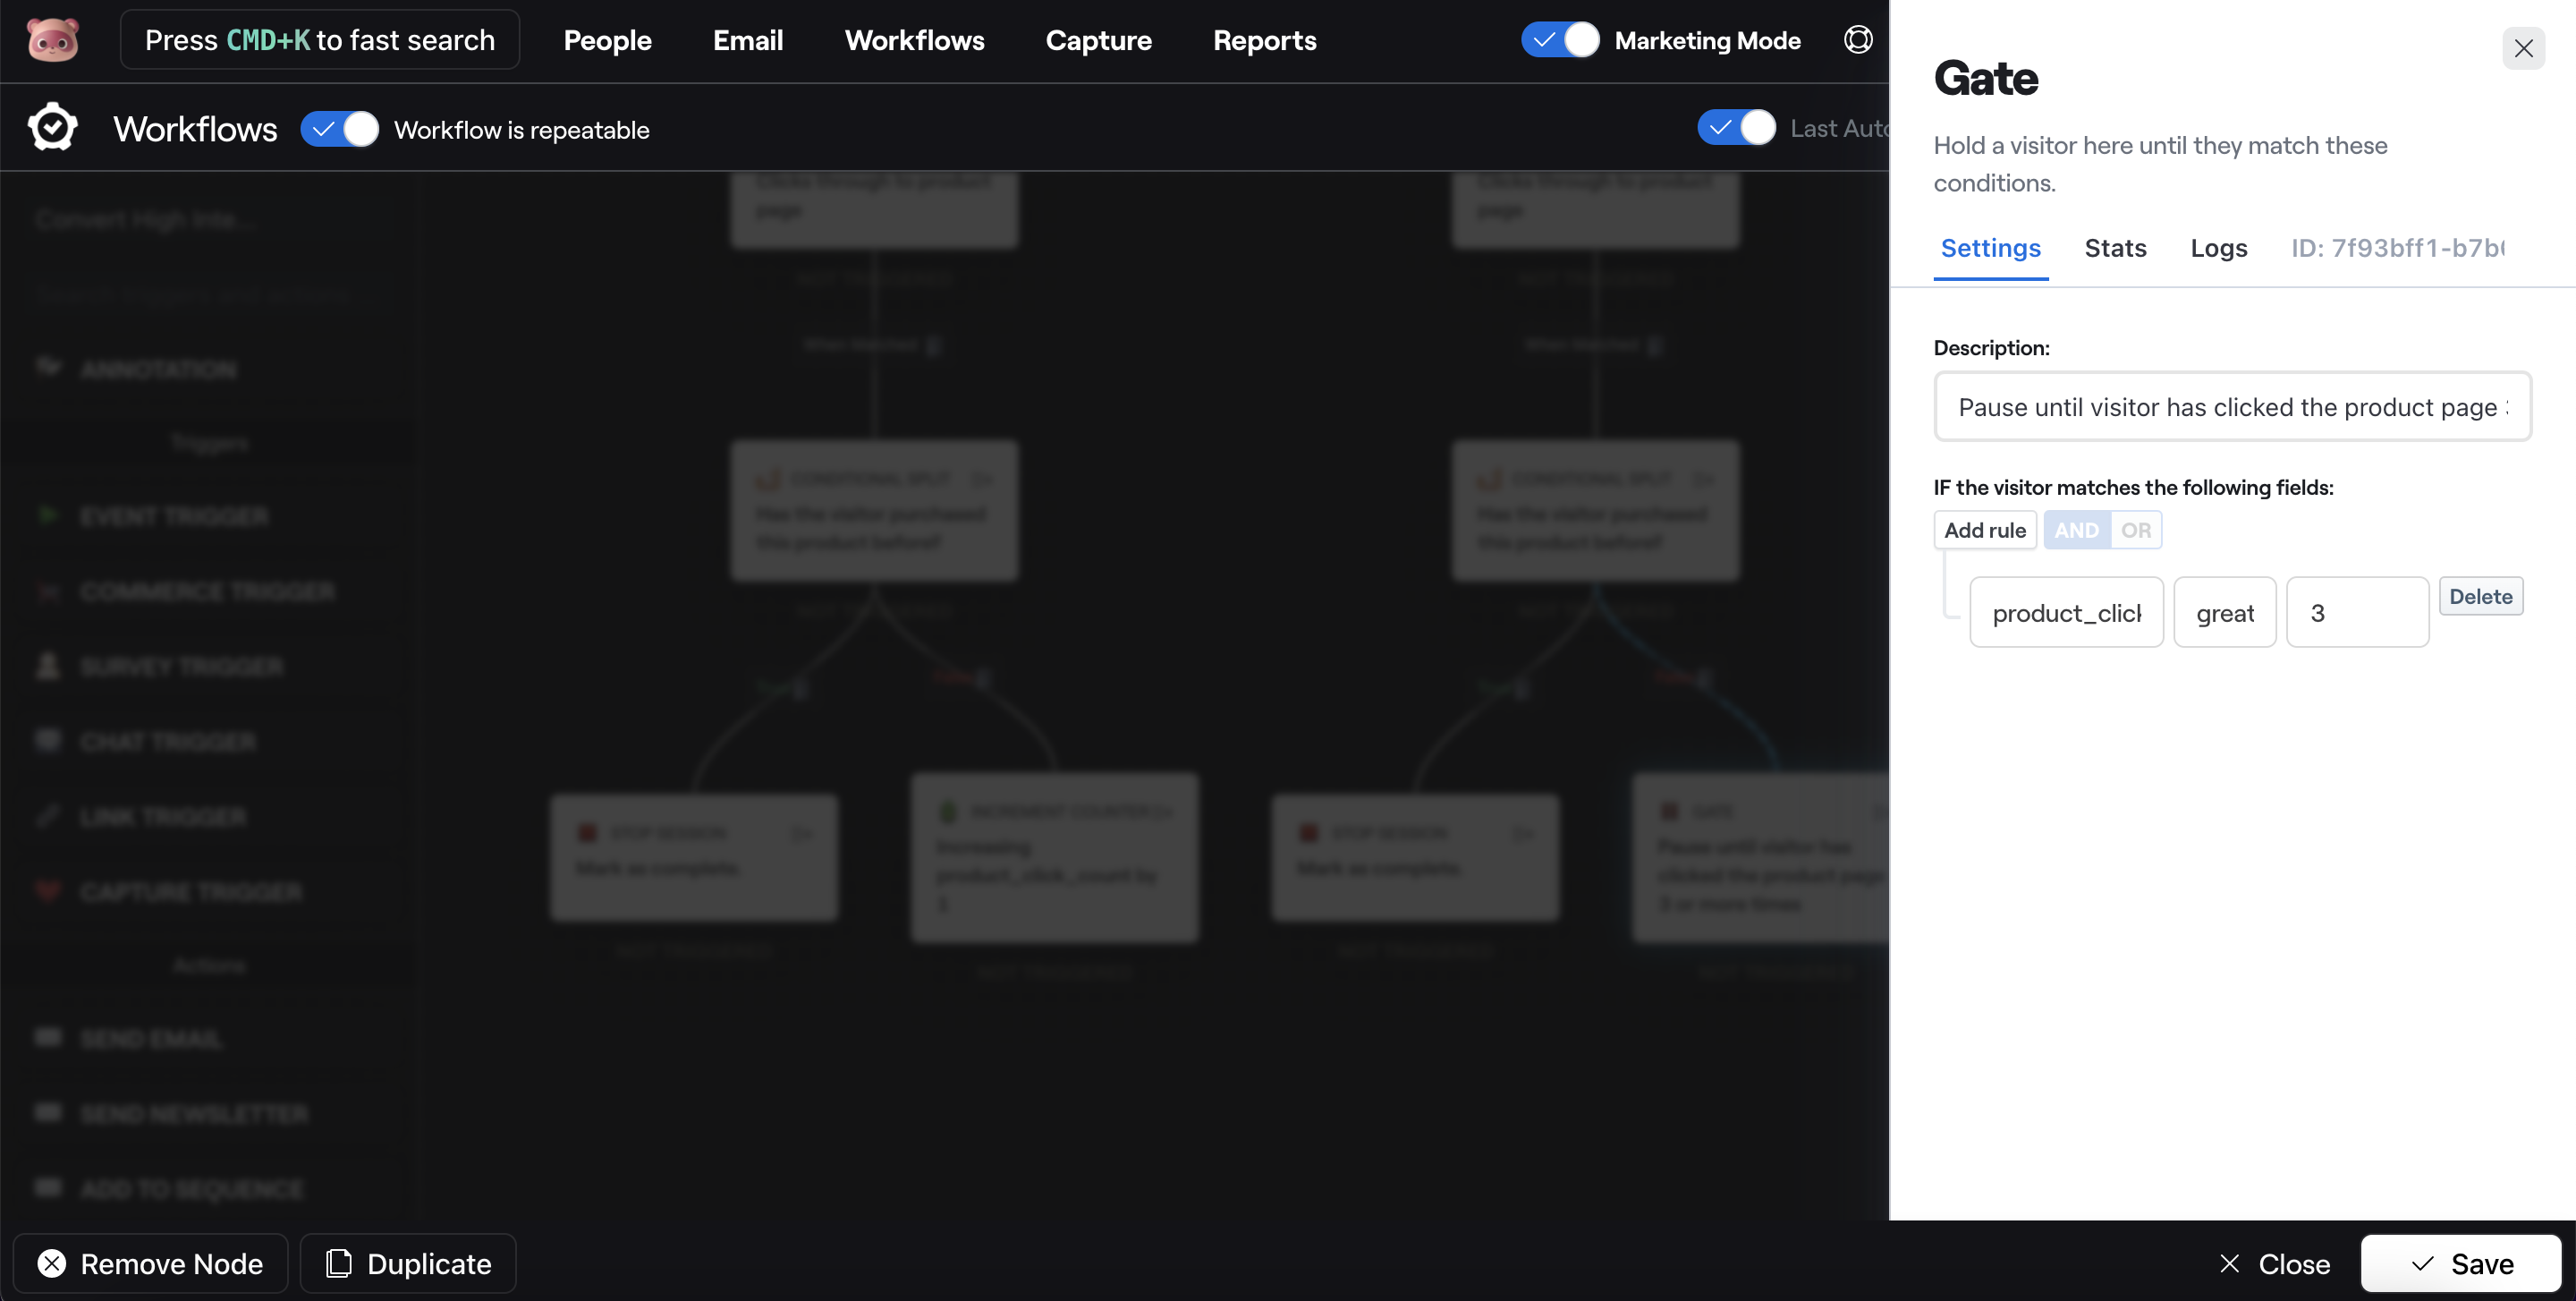
Now for where the 2nd flow differs from the 1st, we want to add a Gate node to the False branch of the Conditional Split. This Gate will prevent the subscriber from progressing through this flow until they match a condition. For us this will be until our custom field product_click_count is greater than or equal to 3. Here's the Gate settings:
Add a Add to Sequence node and connect the Gate node to it. Here you will want to select the Email Sequence that you previously created.
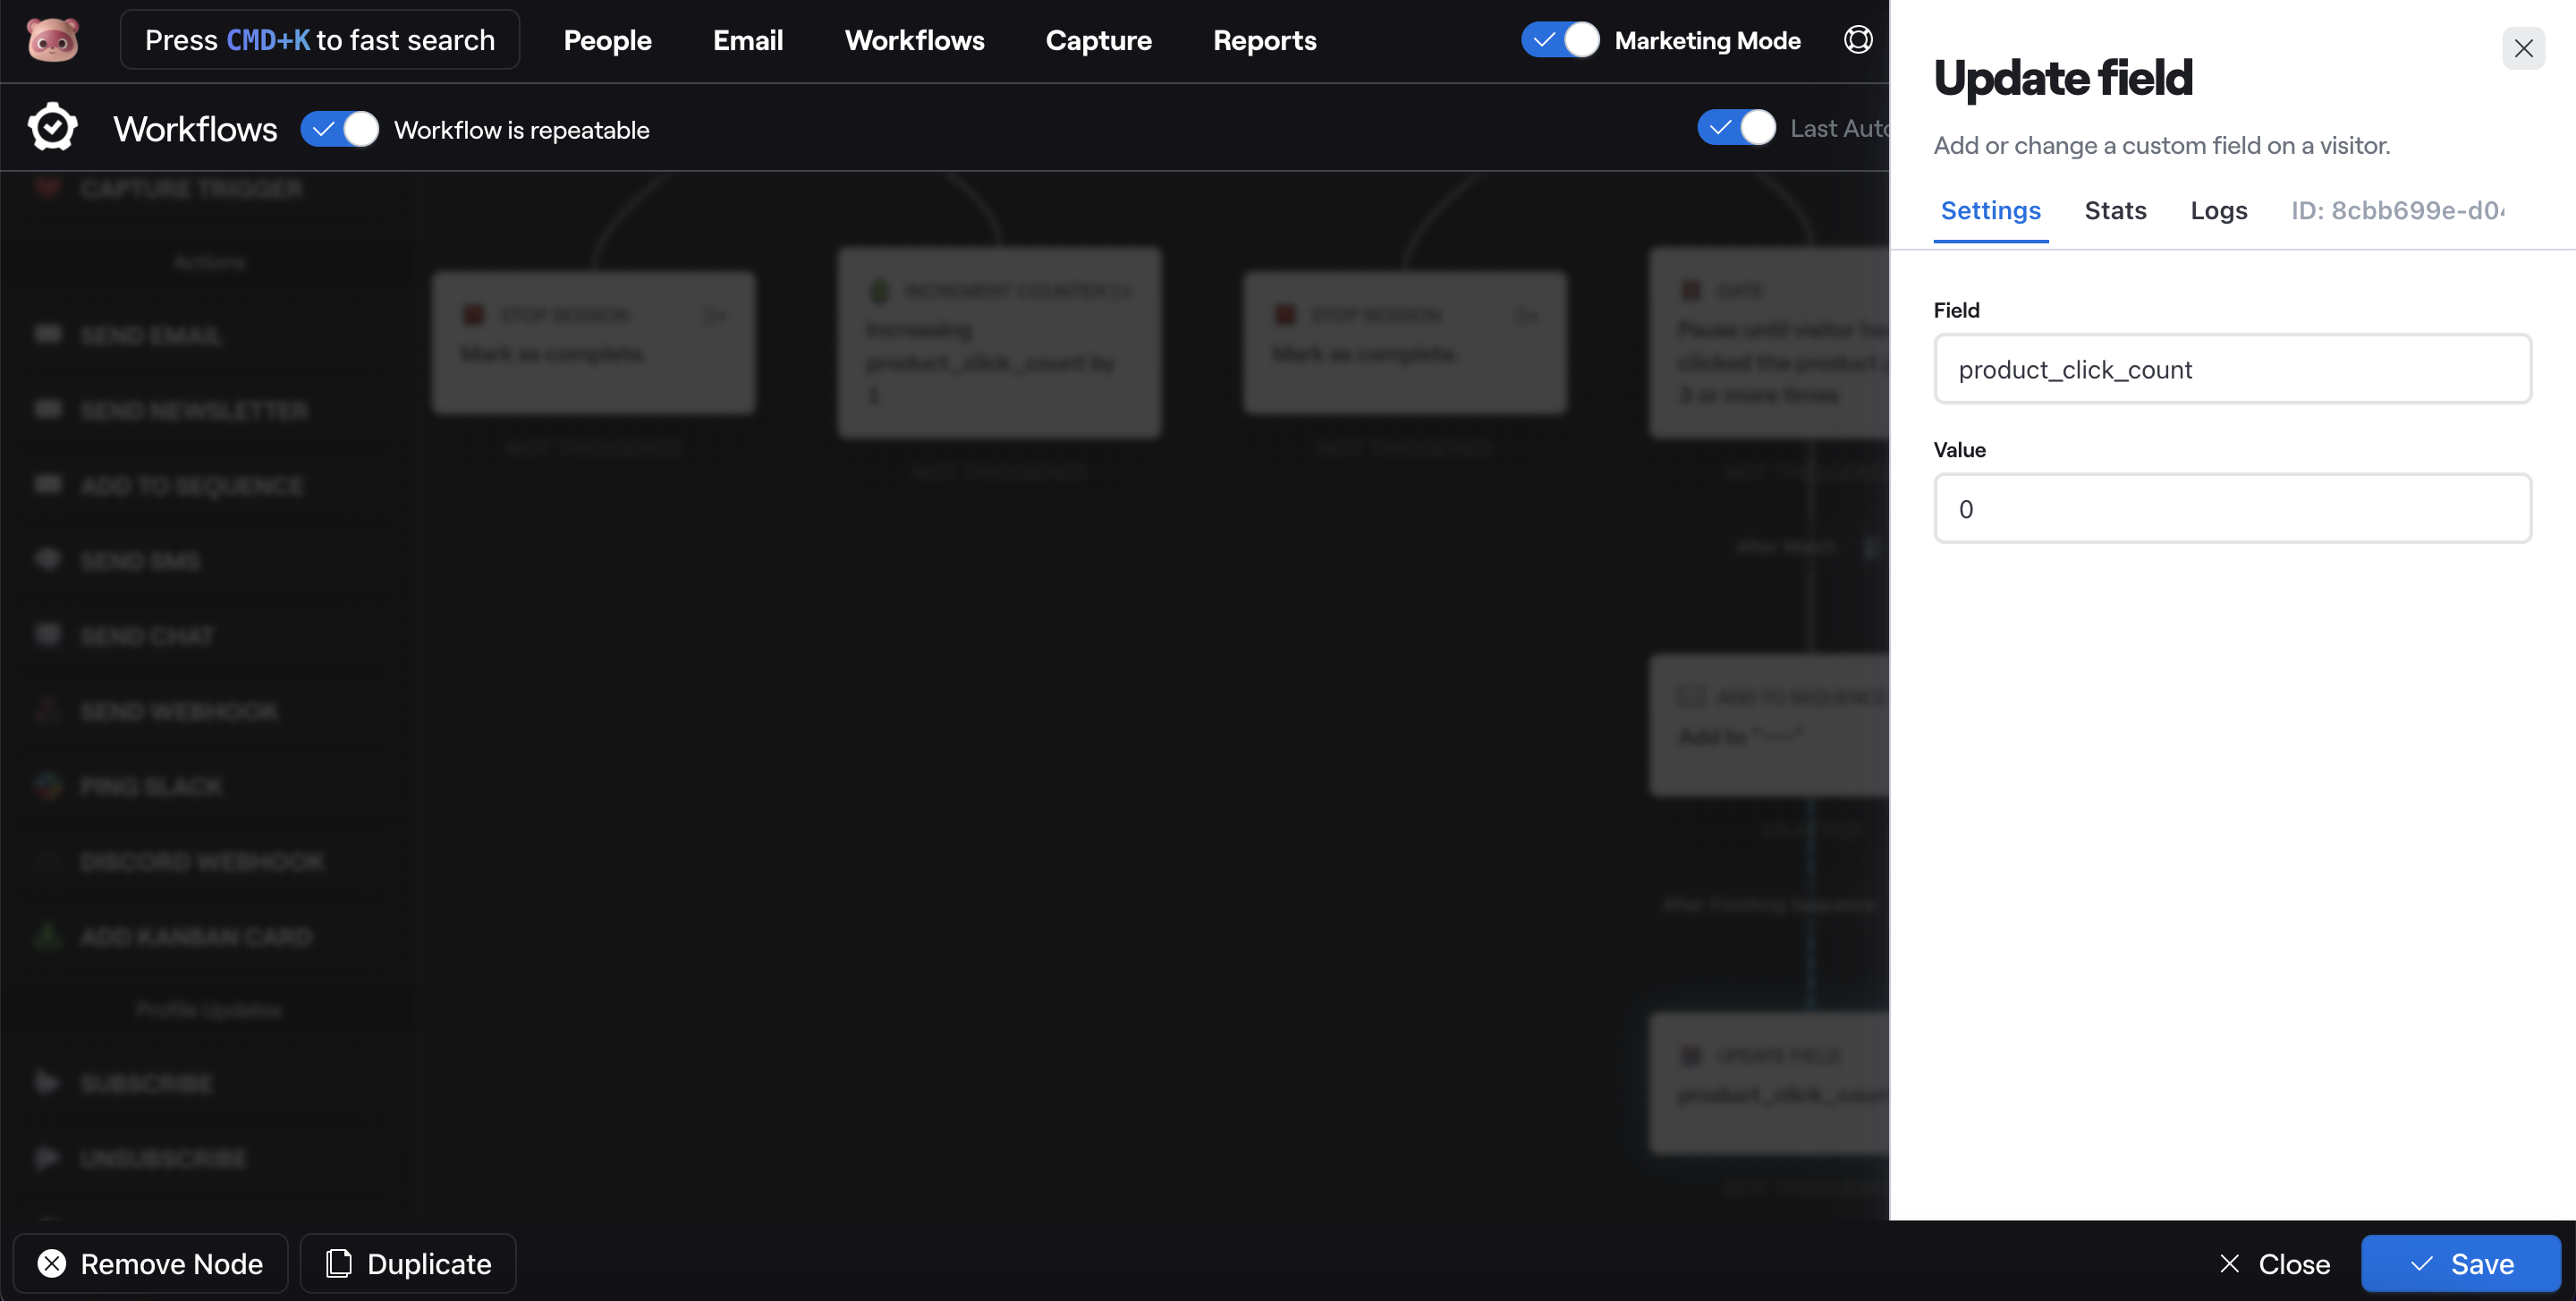
Finally, drag a Update Field node and connect it to the Add to Sequence node. This is the final step of the 2nd flow and we simply want to reset the subscribers product_click_count back to zero.
Testing
It's important to test your Workflows before you set them live to ensure they're working as intended.
To do this, you first want to create a view event by clicking on your website's product page. Once you've done that, go to the subscriber's profile that has just created that view event and click on the Copy UUID button for that event.
Whilst you're in your subscriber's profile, for the sake of the test, add a custom field for product_click_count and set the value to 3.
Now go back to your Workflow and click the play icon in the bottom right which will open a modal where you can enter your event UUID for the test. Once you've added that, click Run Test and you should hopefully see "Test Matched" down the correct path of each flow.
Complete Workflow
Once you're happy with the Workflow setup, the final step to set your Workflow live is to click the Not Processing button, which once clicked with show as "Live & Processing Events".
To recap on the Workflow we've just put together, here's what your final Workflow should look like: